
Magnolias Bell Pull
A Rug Hooking Exclusive Pattern
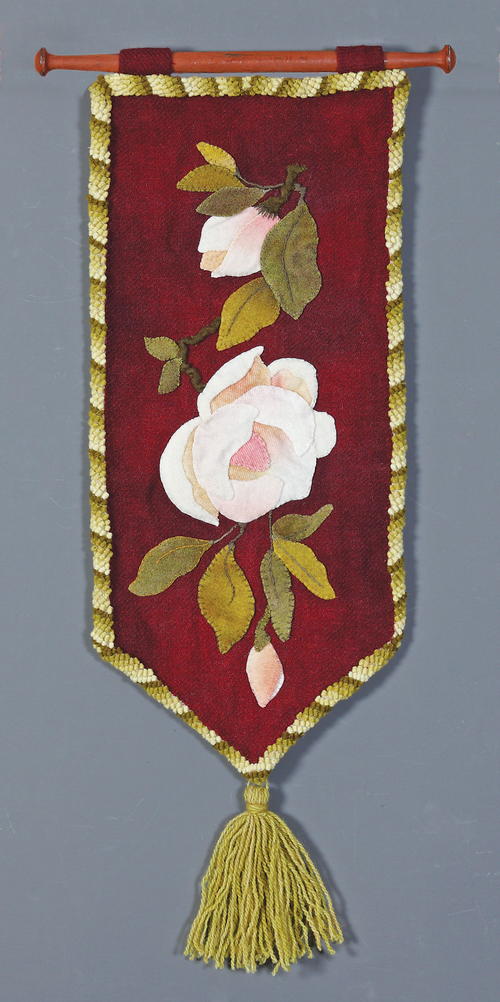
Magnolias Bell Pull, 9.5" x 21", #4-cut wool and wool appliqué on linen. Designed and hooked by Susan Sylvia of Ram in the Thicket,Plainfield, New Hampshire, 2010.
Magnolias are one of the most elegant motifs used in crafting. They evoke the grace of the South and the hot, sultry days of summer. With this bell pull, we incorporate rug hooking and wool appliqué, a craft that has evolved and grown in the past 10 years. The hooked border is rolled around to the back, creating the look of a piped edge, an innovative technique for rug hookers. This example is made using primitive colors, but magnolias are neutral shades, so many different backgrounds and leaf colors could be used to suit one's decor.
Preparing the Pieces for the Bell Pull
The bell pull is constructed to allow the appliqué and hooking to blend together. The red background, once it is appliquéd with the magnolias, is stitched onto a traditional linen base, whose own edges extend at least 2" beyond the outside edge of the red background, on all sides. This allows for about 1" of hooking all the way around (shown by the outside outline on the pattern), plus a large seam allowance beyond that to account for some raveling as you work, and to allow for a portion to be turned under during finishing. Cut the linen at least 1" beyond the outside line on the pattern.
Cut the red background (or the color of your choice) to size using the inside outline on the pattern. I used wool, but velveteen, velvet, or other medium-weight fabric could be used. The outside line on this pattern shows where the hooked area will fall, and the hash marks in the margin show in which direction the hooked lines run, all the way around the border. Cut the linen at least 1" beyond this line and finish the edges as you normally would when preparing to hook.
I used a series of spot and dip dyes for the leaves and petals. For the magnolias, I dip dyed white wool in a favorite red formula called Bloodroot to get a blush of salmony pink along the edges. I then dipped some of the pink areas in yellow to get some warm buff tones to use for the petals in the background, which would, of course, be darker.
Swatches for the leaves were spot dyed using variations of a popular formula for green that contains 80 percent yellow and the remainder in equal parts of red and blue. This spot dye results in a very primitive green that I named Corn Stubble. I like this warm green with the magnolias. Whatever green you use, make sure that your spot dyes contain a lot of sharp contrast in value and shade; otherwise, the variations in color will not show up on the small pieces used for several of the leaves.
Cut out the paper pattern pieces, pin them to the wool, and cut the wool shapes using the picture of the finished piece as your guide for how to incorporate the shading. Cut some of the magnolia petal pieces with white on one edge shading to pink on the other. Keep in mind how a real magnolia might look and how sunlight affects the color. For instance, looking through one of the splayed out petals to the back of the blossom might produce a buff color or perhaps some shadow. When cutting the leaves, put darker areas of wool where shadows might be. Use a variety of greens that are similar to each other but vary in value and shade.
With the pattern as your guide, sketch out the major elements of the design onto the wool background using chalk or other erasable marker, then place the pieces. Nature being the wonderfully random force that it is, any variation in placement, providing that the various parts don't get too out of whack, will be fine, and perhaps even preferable to the pattern!
Stitching
Pin or staple the pieces to the background. Most wool appliqué is stitched on with the blanket stitch (also known as the buttonhole stitch), but many other beautiful stitches can be used to attach appliqué pieces. Two other common embroidery stitches were used for Magnolias: stem stitch and satin stitch.
Sew the pieces down, following the numbers on the pattern. Properly fulled wool doesn't easily ravel, so use very fine stitches to sew the small pieces. If you have to tear a piece out, do so gently, snipping the threads regularly, to keep any raveling to a minimum. If a piece does ravel, start again with a fresh piece or use fine-pointed scissors to snip off the little threads along the edge before re-sewing.
Don't be afraid to show the wool who's the boss: bend and twist pieces to create movement. A few properly placed pins can shape petals to your will. Pieces can also be ruched, or buckled, to create three-dimensional effects.
To create the larger stems, I took a narrow strip of brown wool and whipstitched it into a little tube. Then I placed the tube seam side down on the background and tacked it in place here and there, twisting it and bending it to fit the shape I was after. I also used a small running stitch to gather the tube irregularly to give the appearance of gnarled wood. Smaller stems are created with the stem stitch and satin stitch.
Embroidery tips: Vary the size, thickness, and spacing of the blanket stitch for different looks. Use a double thread in a contrasting color and large stitches to add texture or emphasis. For more subtle details, use a single thread in the same color with smaller and fewer stitches.
Hooking the Border
Once you have all the pieces attached, make sure that all edges of the background and the linen are on the straight-of-grain, then sew the background onto the linen right along the grain line. Use a small blanket stitch in a color that matches the background if you are using a textured wool that does not full well or other fabric that may ravel; otherwise, whipstitch the background to the linen.
Note: You could try turning the edge under a tiny bit, although I chose to leave the edge raw to keep it smooth and flat. Keep the stitches small; they will be obscured by the hooked loops at the edge.
Hook an edge about 1" wide all the way around. I used a #4 cut, and at this size, the border was six to seven loops wide. I used a diagonal pattern, but you might choose horizontal stripes, dots, or a swirly pattern. Make sure you place a loop right up against the edge of the wool background in each row to obscure the edge.
Because the border is so narrow and is rolled at the end, I kept all the tails of my hooking to the wrong side of the linen, and trimmed them all as short as I dared, to reduce bulk inside the rolled edge.
Finishing the Bell Pull
Turning the edge of the border is the most difficult part of this project since you will be folding the hooked border almost in half toward the back of the linen. Trim the linen to within ½ inch of the hooked border; finish it temporarily if you're concerned about raveling. Cut the tips of the three right-angled corners diagonally (the two corners at the top and the point at the bottom) and remove a few loops of hooking, taking the sharp corner off. This step will reduce the bulk when turning the corners back.
For the two corners at the lower area of the bell pull, which are at a 45-degree angle, it's possible, with just a little trimming of the linen, to ease around the corner as you turn the edge under. In both cases, finish those linen edges as you trim to prevent the kind of raveling at this stage that will make it difficult to turn the corners.
Starting at the middle of the top edge, work from right to left, turning the edge of the linen under and whipstitching it in place. This is where keeping everything on the straight-of-grain will pay off. Using small stitches, go in at the same row of threads on the back of the linen, push the needle up through the turned edge at the same row of threads, then pull everything tight, keeping the needle above everything to be encased in the rolled edge. As the thread is pulled tight, the rolled edge forms itself. Work toward the corners, tucking any excess linen and wool strips under with the needle and stitching.
Wool is so forgiving, and you'll see that it finds its place as you roll the edge. Buy or make a nice tassel or bell, and attach it at the back of the piece. Make a couple of loops to attach to the top edge so you can hang it from a bell pull hanger or a craft spindle, or create a rod pocket. Whipstitch a backing of wool or velveteen to cover everything on the back, up to the rolled hooking.
Susan Sylvia is a wool dyer and owner of Ram in the Thicket, an online hand-dyed wool site. She has been dyeing for 11 years and finally made her hobby her chosen profession. Wool appliqué is her favorite medium, and motifs drawn from medieval and traditional arts shape her style. To see Susan's personal approach to dyeing and categorizing color, visit raminthethicket.com. This pattern is for personal use only, and reselling of the pattern is prohibited.
This article is from the March/April/May 2011 issue. To get this exclusive pattern or for more information on our issue, check out our issues page.
Read NextMoxley Sampler


