One Slice or Two?
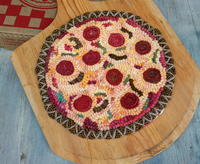
A hooking that looks good enough to eat

I recently took part in a mat swap ALL ABOUT food. What a great theme to get the creative (and gastric) juices flowing! Many design possibilities danced in my head: gummy bears; bacon, lettuce, and tomato sandwich; ice cream sundae; spaghetti and meatballs; and pizza. The pizza idea won—who doesn’t love pizza? I was off to design my mat.
I’ve designed and hooked lots of round mats in the past and I like the shape. For my pizza, I traced around a 10" dinner plate. Then came the fun part—deciding on the toppings. So many different ways to go, but I was in the mood for pepperoni, anchovies, green peppers, and lots of cheese.
I happened to have a perfect piece of wool that I had dyed for another rug. It was a pale spotty yellow with some pink and brown spots. How I ended up with such a wacky dye job, I don’t remember. It apparently wasn’t used for the original rug, but was just perfect for this pizza mat. That happens a lot when I dye wool. I’m no expert dyer so I often end up with wool that’s not quite the right color. I then go back to the dye pots. I know that any wool that doesn’t come out just right for the project at hand will work out great for another rug. Rug hookers never waste a good piece of wool.
Materials List
- 16" square piece of unbleached primitive linen
- 1/4 yard spot-dyed wool for the cheese background
- #8-cut noodles for the pepperoni, green peppers and anchovies
- 14" square piece of brown wool for the "crust"
- wool yarn to overstitch
Toppings
Having decided on the cheese-y background, I needed some colorful pizza toppings. I went to my noodle bin and pulled out dark red-orange, green, and brown #8 cut noodles—perfect.
I made standing wool quillies for the pepperoni to add some texture and interest. These quillies were made by using two wool strips and rolling them up together jellyroll style. I sewed through each one horizontally to secure them so they would not unroll. Then I sewed them to the linen before hooking the background around them. Sewing quillies onto the linen and hooking around them leaves a “blank” space on the back of the linen.
Finishing
Once the hooking was completed and the mat was steam blocked, I cut 3" of excess linen around the pizza and folded 21/2" to the back, leaving 1/2" showing all around.
I selected a nice brown wool with little black dots for the “crust.” I laid the mat right-side up on top of the brown crust wool and cut the wool about 1" larger all around the mat. I folded the brown wool up and around the linen edge as I folded the cut edge of the wool once to the inside. Then I basted it in place all around the pizza.
Using a heavy tan wool yarn, I stitched the edge in a crisscross pattern for a little extra interest. All finished and looking good enough to eat!
This article is from the June/July/August 2016 issue. To get this pattern or for more information on our issue, check out our issue page
About the Author
Karen Larsen started hooking rugs in 2006 while living in Maine. Now living in rural south central Pennsylvania, she combines her love of rug hooking with over thirty years of experience in graphic design to form her hooked rug pattern business, Crow’s Foot Farm Designs, LLC. She is a member of ATHA, co-founder of the Magdalena Rug Hookers of Perry County, Pennsylvania, and its splinter group, Maggie’s Meyvns. Her original rug designs can be found on her website www.crowsfootfarmdesigns.com
Read NextBird in Paradise