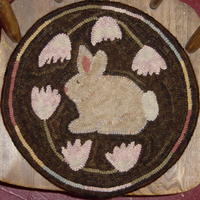
Clover Chair Pad
A Rug Hooking Exclusive Pattern
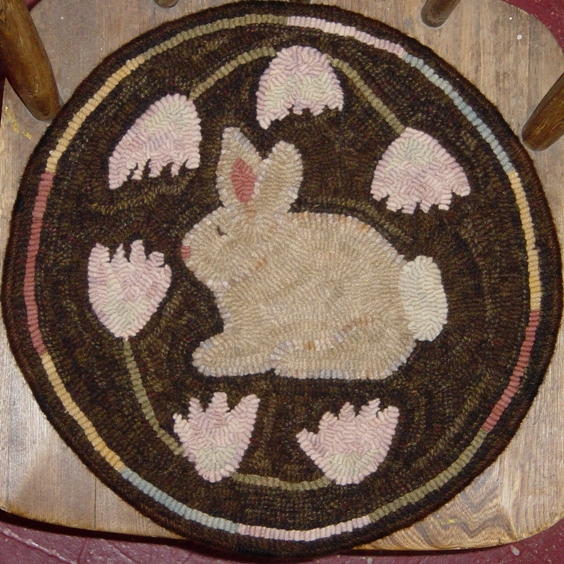
Do you remember picking dandelions, violets, and clover for your mom? When I was young, the neighborhood children made dandelion chains and clover chains that stretched clear around our city block. Childhood memories of simpler times inspired this simple mat.
Step 1: Transfer the pattern
Transfer the pattern to your choice of foundation fabric by using a light box or, my favorite, Red Dot Tracer and a permanent marker. Lay the Red Dot on top of the paper pattern and trace the design with a marker. Now, move the Red Dot to your foundation, centering the design on the backing and lining up the dots with the threads of the fabric, to keep on grain. With the marker, go over all the lines again; the marker will bleed through to the foundation. Depending on how old your marker is, you may need to touch up the lines after removing the Red Dot pattern.
On round or oval rugs, I like to sew a row of zigzag stitching just outside the outer border line to maintain the round shape of my mat. If you like to sew on twill rug binding on before hooking, you won't need stay-stitching: the binding will serve the same purpose.
Step 2: Prepare the wool
I used a #8 (1/4") cut, hand trimming the strips if necessary, but you can use whatever size strip you like. The wools used in this mat are a mix of my hand-dyed textures and solids.
Step 3: Hook Clover, the bunny
Begin by outlining and filling in Clover's tail with dirty white wool. Outline Clover's body with grungy hound's-tooth check wool, changing to a few loops of apple cider wool for the nose. Clover's inner ear is hooked with the same apple cider wool. (Yes, I know his ears are a bit wonky; change them if you like.) Fill in the body with stone textured wool. Clover's eye is hooked with dark plaid background wool—just two tails. Marry a starting tail with an end of the stone wool. Then, pull up an ending tail, and start another strip of stone in the same hole.
Step 4: Hook stems and flowers
Hook the flower stems with the sage over plaid wool. The flowers are outlined, and the top portions are hooked with mottled mist wool. Fill the bases of the flowers with the same dirty white as Clover's tail. Just for fun, I reversed this order on the flower just above Clover's ears. To help hold the shape when hooking the flowers, hook a row of background wool next to the outline row, then fill in the flower. I wanted my flowers to be a bit rough around the edges, but if you prefer crisper points, use a smaller cut of wool for outlining or hand trim your strips to narrow them. Another trick for great points: put your hook in at the point, hold your wool strip underneath, and pull up a loop from the center of the strip, leaving two lengths, one to be worked off in each direction from the point.
Step 5: Hook the background
Before hooking all the background, hook one row just inside the outer border line using the background plaid. Hook a hit-n-miss beauty line just inside this row. Randomly hook in bits of prairie gold, old blue paint, apple cider, sage, and mist. Finish hooking the background, echoing the elements.
Step 6: Blocking
After the hooking is complete, block your mat by laying it face down on a fluffy towel, covering it with a press cloth or flour sack dish towel, and steam it with an iron. Press the iron down gently; don't iron back and forth. Allow the mat to cool and dry.
Step 7: Finishing
My preferred method is a whipped corded edge. I know some of you cringe at the thought, but I like the way it cushions the raw edge of the last hooked row. Before trimming the excess foundation, I zigzag stitch about 1 1/2" out around the last hooked row, then trim the backing away. I use a 5/32" cotton cording. Place the cording behind the backing and fold the edge over. Baste it in place. The basting stitches should lie in the ditch between the last hooked row and the cording. The cording should be beside the last row of loops not under it.
Thread a large eye tapestry needle with yarn. Secure the yarn by running the needle under the backing for an inch or so, then begin whipping. Whip around the corded edge by placing the needle in close to the last hooked row. Stitches should be close together so no backing shows through. To join a new length of yarn, stop when you have a few inches of yarn left and thread this tail back under the stitches you have just completed. Remove the needle and thread a new piece of yarn. Run the needle under a few inches of completed stitches, being careful not to catch the tail you just hid, and continue whipping around the rug. Trim off any tails close to the stitches.
With matching thread, stitch the twill binding tape around the outer edge, slightly covering the yarn binding, Stitch the inner edge in place covering any foundation edges. On the round mat, the twill tape will naturally form little pleats; try to space these pleats evenly. Steam the finished piece again, if necessary.
This pattern is for personal use only. Reselling of the pattern is prohibited.
This article is from the March/April/May 2010 issue. To get this exclusive pattern or for more information on our issue, check out our issues page.
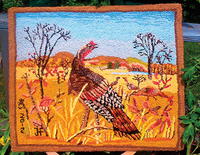
Read NextWestmoreland Ponies