
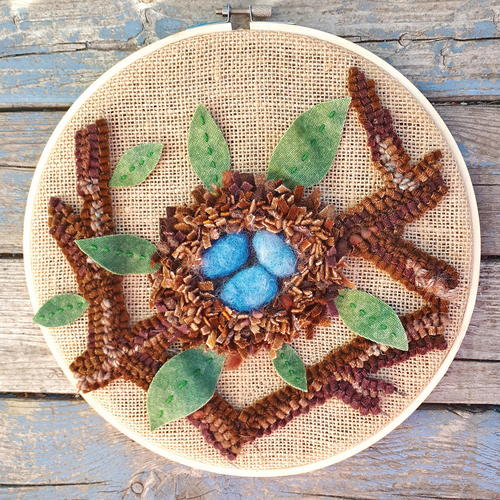
The Charm of Bird Nests
Hook, felt, and prod a springtime nest
The charms of springtime are many, from the early crocus to the sight of the first robin. My favorite, by far, is the bird nest.
Endlessly fascinating, the styles and materials that make up bird nests show the incredible resilience, diligence, and flexibility of all nesting birds. I am often inspired to hook and needle felt bird nests.
One of the things that I love about working with wool is that you can do so much with it. When it came time to prepare for a workshop recently, I let my love of nests be the focus and
I combined four wool-working techniques into one project. This project uses traditional rug hooking, proddy rug hooking, needle felting, and cutting and stitching on wool.
Materials List
- 10" hoop
- pattern on burlap
- wool fabric for strips and leaves (brown and green)
- roving wool for lining the nest (gray, brown or cream) and for the eggs (a shade of blue, pink, white, etc.)
- a single felting needle or a 3-needle felting tool with needles
- Craft foam, at least 5" square
- cotton floss
- traditional rug hook
- embroidery needle
- sharp scissors
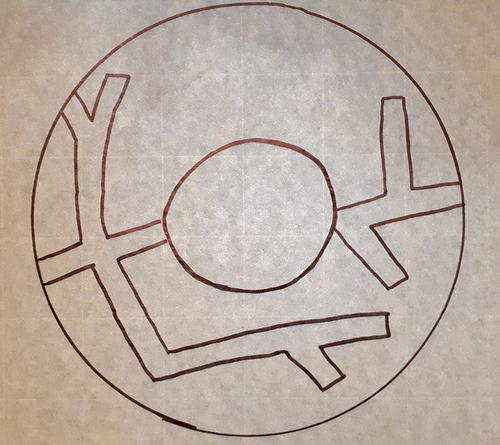
Prepare the Burlap Pattern
Cut a 15- to 16-inch square piece of burlap and sew around the edges. Trace a 10" circle on your burlap. Sew around the circle, about ½” away from the edge. I also sew around again about 1½" out from the circle. This helps to reduce fraying of the burlap when you are gluing it down to finish the piece.
Draw or trace the pattern onto the burlap. Enlarge the pattern to make it fit within the 10" circle.
Hook the Branches
The branches are created using traditional rug hooking, either with the tails brought to the front or to the back. Use wool strips and yarn in a variety of shades of brown and a variety of textures. Add an accent color, such as a warm brown, green, or gray, to add interest and life to the branches. Move around your piece as you hook the branches. Spread the colors and textures around your piece. This creates repetition, makes the eye move around the piece, and adds interest and balance. Add the accents as you hook the branches. As you trim the branches, save the shorter pieces of wool to use as proddy pieces in your nest.
Proddy Hook the Nest
To proddy hook the nest, you will use your traditional rug hook. Simply use short pieces of wool strips or yarn and bring both tails to the front of the piece. You can trim the tails one by one or trim them all at the end. Use the same accent pieces from the branches and put them in different places around the nest. You may also want to add another accent color to use in the nest only. Work around the outside of the nest first, gradually filling the nest in. Leave about 1½" to 2" in diameter in the center of the nest.
Lining the Nest
To line the nest, remove the burlap from the hoop. Place the Styrofoam block under the nest area. Place a small piece of wool fabric (about 41/4 inches square) under the nest area, in between your burlap and the Styrofoam. Use gray, light brown, or cream-colored roving wool to line your nest. Place the roving wool inside the nest, on top of the burlap. Use a single needle to attach the wool fabric and lining (they will be needle felted at the same time). The roving wool will attach to the piece of square fabric, through the burlap. The piece of wool fabric will remain in place after you have needle felted the roving wool to line the nest. Poke gently to attach the roving wool (on top of the burlap) to the wool fabric (under the burlap).
It will not take much needle felting for the wool to attach. You will be able to tell when you are poking through openings in the burlap. It is OK to occasionally poke the burlap, but if you need to push hard to make the needle go through, remove the needle and try in another spot.
-
Size this to ft comfortably inside a 10" embroidery hoop.
Needlefelt the Eggs
To make the eggs, pull off a piece of roving wool and roll it into a ball. Use either a three-needle felting tool or a single needle to “felt” the eggs. Poke the ends and the middle into an oval shape. Rolling the oval shape in between your hands gently will also help to shape the egg. Leave one end of the egg slightly fatter than the other to get an egg shape. Make three eggs for your nest.
Place the eggs in the nest in the positions that you prefer. Use a single needle to poke the eggs in place, poking only at the base of the eggs to attach them to the lining of the nest. Once your eggs are in place, you may decide to add more proddy pieces to your nest. You may also want to poke your lining down a bit more. Do this gently with a single needle.
-
Leaf shapes
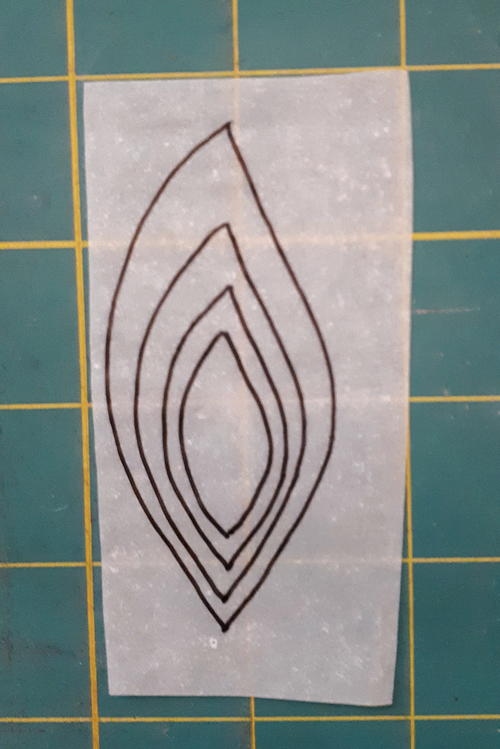
Cut, Stitch, and Attach the Leaves
Use the leaf template to shape your leaves. Use as many as you like, in the sizes that you prefer. Here are the steps for making the leaves:
•
Photocopy or trace the leaf template onto paper.
•
Place the leaf outlines under freezer paper and trace as many as you would like. Use a lightbox for tracing, if you have one. Trace the outline of the leaf onto the matte side of the freezer paper.
•
Cut out each leaf, leaving a small border around it.
•
Iron the leaves, shiny side down, onto your wool fabric.
•
Cut the leaf and paper from the fabric, cutting around the traced lines.
•
Peel the leaf from the paper.
•
Place the leaves where you want them to go. With matching or
contrasting cotton floss, sew a
running stitch down the center of each leaf.
Finishing the Nest
Remove your burlap pattern from the hoop. Trim away the burlap, leaving
1½" to 2" all the way around. Do not trim inside the sewn circle closest to the project. Return the project to the hoop and tighten. Make sure the metal mechanism of the hoop is at the top and center of your piece.
When you are happy with the tightness, glue the burlap to the hoop. Use Aleene’s Tacky Glue or another glue that you have used with fabric and are comfortable with. Work your way around the hoop, gluing the burlap to the hoop. Hold the burlap in place for 10 seconds in each spot as it dries. If you have narrow cotton ribbon, glue
it on top of the burlap. This step is
optional, and it will finish off your
project very neatly.
Hang your nest on the wall or place it on a shelf.
Feel free to contact me if you have any questions or comments. I am happy to help you with your project. You can find me at: Gwen Dixon Wool Arts, on Facebook and Etsy.
Gwen Dixon is a fiber artist from Riverview, New Brunswick, Canada. Gwen gives workshops in rug hooking and needle felting and is completing a university program in adult education. Gwen’s work has been shown in art galleries in Nova Scotia and New Brunswick.
Read NextPearl Cotton Sunflower

