Designing with Geometrics
Lessons learned by a rookie hooker
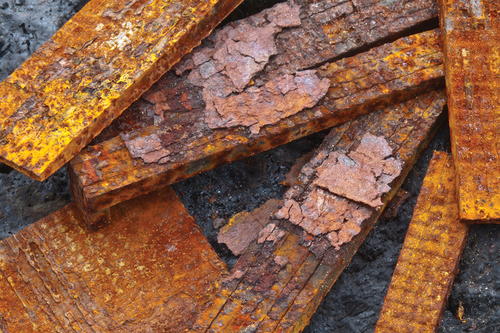
I am a photographer and I like to use my photos as my patterns rather than recreating someone else’s designs.
My first piece was hooked with wool strips and I nearly quit right there and then because I didn’t like the way the wool strips looked in the piece. My next project was all in yarn and I fell in love. With a full skein of yarn and a small-to-medium project, I would never run out of the right color. I hooked most of my tapestries over the next few years with yarn.
I recently challenged myself
with a larger project: a floor mat
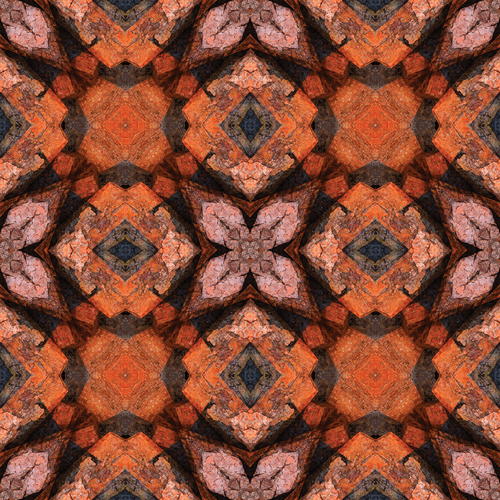
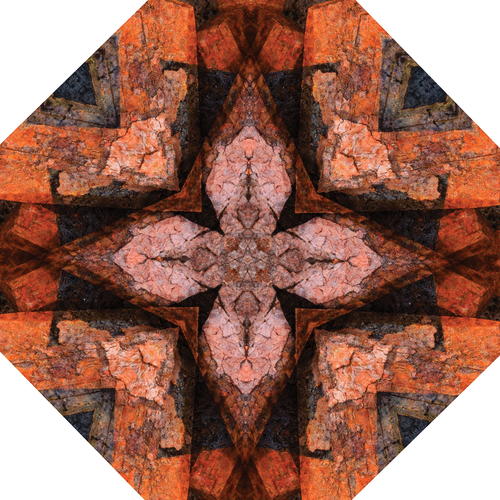
(32” x 32”) for my daughter, using one of my kaleidoscope images and hooked with wool strips.
In her book, Geometric Hooked Rugs, author Gail Dufresne reminds us that “Inspiration can come from anywhere . . . . The simplest, most mundane objects can grab us.”
I thought of my collection of kaleidoscope images and went looking for inspiration.
My daughter’s favorite colors are purple and teal/turquoise. I tend to plan as I go, rather than preplan.
As you will see, that is not the best idea.
So here is what I learned from this project.
Lesson #1: Keep the backing straight when drawing the pattern
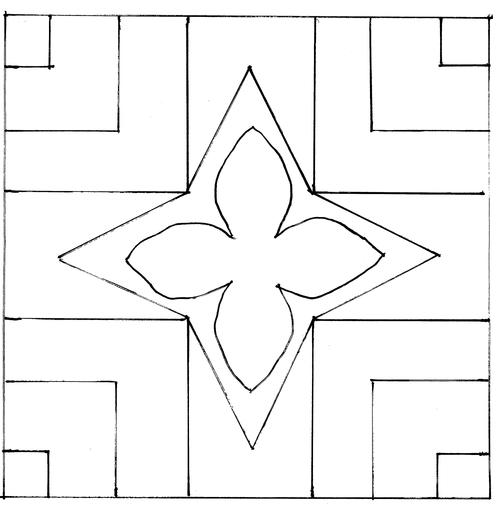
Make sure the backing is straight and doesn’t slide around when transferring the pattern. I quickly realized that some of my lines didn’t line up so I had to make some adjustments. The corner elements in the original image were diagonals, and when I put them on the backing they were skewed. When I started hooking, they were out of line. I changed them to straight lines to make things a little easier to hook. I had already hooked the center elements, so it was a bit of a challenge to line up the corner elements from one side to the other. I had to measure and count rows over and over again to get the lines even close to lining up properly.
-
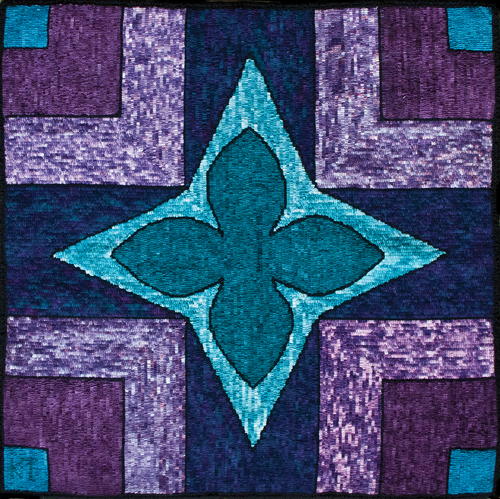
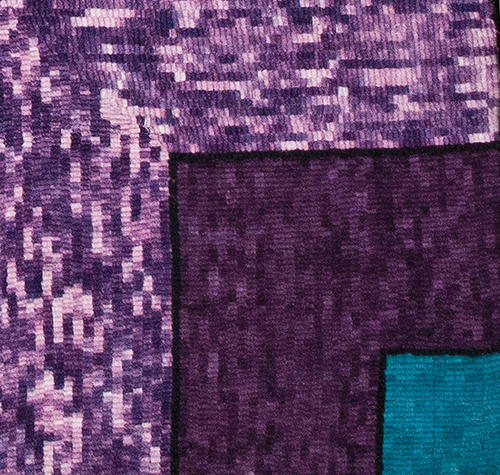
Star Bright, 32" x 32", #5- and 6-cut wool on linen. Designed and hooked by Kate Thornhill, New Brunswick, 2019.
Lesson #2: MAKE SURE THE PATTERN IS LINED UP CORRECTLY BEFORE STARTING TO HOOK
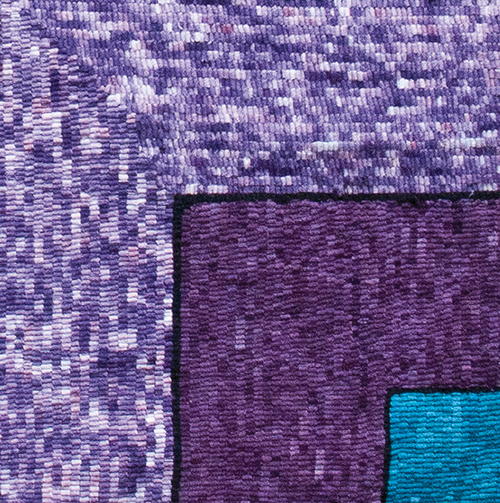
If I had simply drawn pencil lines in-the-ditch of the backing from one corner element to the other before I started hooking, everything would have been better. I did use pencil lines to mark the center, and the central elements lined up with these lines.
CALCULATING WOOL NEEDS
I found this calculation for determining the amount of wool for a rug from the Dorr Mill website. Find the square inches of your rug, multiply by the size of your cutter head, divide by 2052 (the square inches in a yard).
For example:
• a rug that is 48" by 48" (2304 square inches)
• multiply by the number your cutter head (I use a #6 cut mostly): 2304 x 6 = 13,834 square inches
• divide by 2052 = 6.7 yards.
LESSON #3: COLOR PLANNING
Make sure you have all your color planning done before starting to hook. My daughter and I picked out some colors she liked and that we thought would work together. I already had some of the background color and I wanted colors that would work with that. I picked up a few more pieces from various suppliers. One piece I liked turned out to be a “one-off” and couldn’t be replicated. I wasn’t familiar with the term one-off, but now I will never forget it! I used this one-off spot-dyed piece as a complementary burgundy color, dyed for the corner element. These two colors worked really well together, but when I couldn’t exactly match the one-off, the spot dyes I used for the other 3 corners didn’t work quite as well with the burgundy. There was more blue in the purple spot dyes. On frst glance it is hardly noticeable, but it really is quite obvious on a closer look. I had already hooked the frst corner and had the burgundy dyed to go with it, so I wasn’t going to redo it.
-
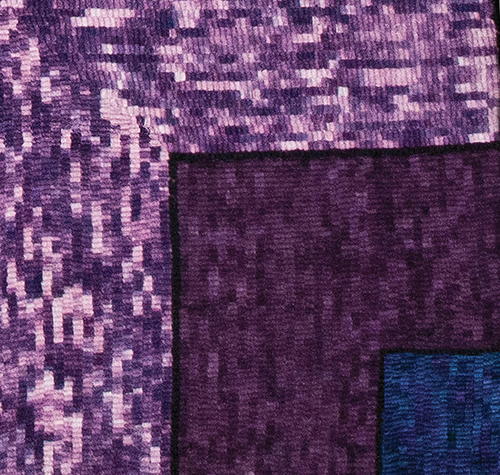
The wool for the space next to the turquoise square was dyed to match the outside corner element. The outside corner element here defnitely has more blue to it; but it still works.
Lesson #4: MEASURE TWICE, HOOK ONCE
Don’t guesstimate! Make sure you have enough of every color before starting a project. The old adage of “measure twice, cut once” is very apt. When it comes to hooking, it is measure twice, hook once. I thought I had enough of the background color to do the entire project, about 1⁄4 yard. That only filled two of the strips out to the edge. I had to wait for the supplier in Lumenburg, N.S. to re-dye more, and I figured 1⁄4 yard more would be sufficient. Not so. I was about 10 strips short. Fortunately, she dyes things in 1⁄2 yard batches so she shipped the remaining 1⁄4 yard to me right away. It is definitely better to have too much rather than too little.
The burgundy to go with the one-off spot-dyed wool was dyed by a local supplier. Again, I guesstimated: when I hooked up the element, I was able to hook only 31⁄2 of the burgundy elements. I needed about 1⁄8 yard more. But she had to redye, and after 3 tries was able to get it close enough to finish that part of the project.
The center star took a bit more than 1⁄4 yard I had, so once again I had to order more of this wool.
Lesson #5: COLOR MATCHING AND Balance between light and dark values
I originally planned to put the background color in the small squares in each corner. I hooked one corner square and liked it until I got the burgundy color hooked beside it. The colors and tones were too close together and canceled each other out. I photographed the piece, and in Photoshop copied the darker color of the center element to the corner—that looked like it would work better. I took out the background color from the corner square and re-hooked it with the darker teal of the center element. Next to the bright spot-dyed teal/turquoise of the outer star, the darker teal pops, but next to the burgundy it was lost again. I had a lighter/brighter turquoise in my stash and when I re-hooked it (Is the third time a charm?) it stood out much better.
So after several false starts, and several trips to suppliers and mail orders, the mat is done. I decided to leave all the mistakes in the piece as a reminder of the lessons learned.
Compare the corner elements with the background color and the turquoise.
-
Compare the corner elements with the background color and the turquoise.
What is next? What have I learned?
My next project is a 48" circular mat with another of my kaleidoscope images. This time, I was more careful putting it on the backing, pinning the red-dot material everywhere possible.
When the design was drawn, I realized there were too many conflicting lines and I really wasn’t happy with it. So I photographed it and printed it out on 8 1⁄2 x11 pages, made ten copies, and used felt markers to color individual elements to make them clearer. After about eight different element identifications and
possible designs, I’ve finally chosen one I like. So now
I have eight possible patterns for future projects (smaller ones like chair pads, pot rugs, and small mats). Now I have to be very careful choosing my
colors and will measure twice and hopefully hook
only once!
One of my favorite adages is: How do you eat an elephant? One bite at a time—with a plan! RHM
Inspiration is everywhere
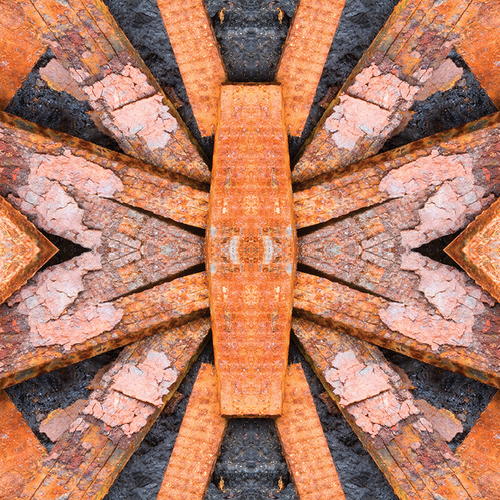
Several years ago in a photography workshop the photographer/teacher introduced each new topic with a slideshow of some of his images. Often he included a slide with a mirror image of the image. I am the kind of person who often asks this question: “If you can do that, why not this?” So I began playing with my images in Photoshop: I created a mirror image, and then a mirror image of that. Then I created a duplicate layer of the mirror, mirror image and rotated the second layer 90° and blended the two images. The resulting image was mind-boggling. I used one of these images to create the mat in this article.
Kate Thornhill has been a photographer since 1998. She began hooking pieces from her photography in late 2013 and is totally hooked on hooking. Her photography and hooked items are available at Sparrowhawk Studio in Long Reach, New Brunswick, Fullerton’s Corner Market in Long Reach, and at the Kingston Farmers’ Market in Kingston, New Brunswick.