For Beginning Punchers
Directions for Punching Busy Bee
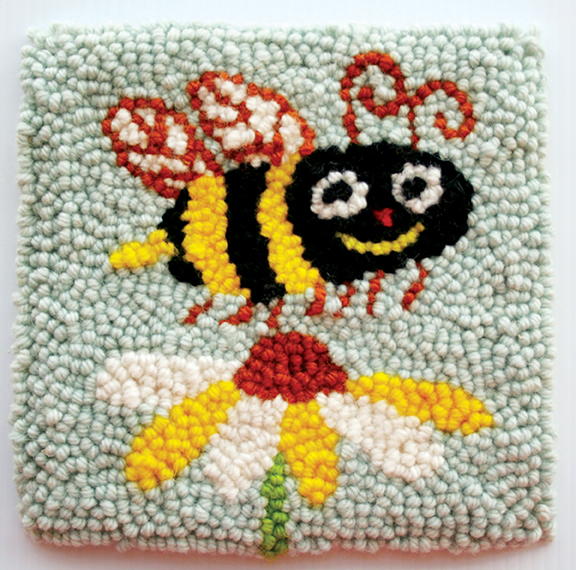
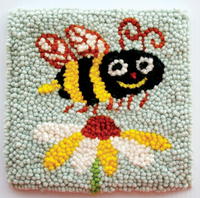
Busy Bee, 8" x 8", 3- and 4-ply wool yarn on linen. Designed by Isa Beniston and punched by Christie Beniston, PUNCH! Studio, Solana Beach, California, 2018.
Busy Bee was punched with an Oxford punch needle. If you are new to punch needle rug hooking, be sure to read The Oxford Punch Needle Handbook that comes with the Oxford Punch Needle, as this will tell you everything you need to know to be an excellent puncher! Amy Oxford’s book, Punch Needle Rug Hooking: Techniques and Designs is even more detailed than the handbook if you would like more in-depth directions and want to learn more about the craft.
GETTING READY
1. Use a #10 regular Oxford Punch Needle, which will make a 1⁄4" tall loop.
2. While creating a punch project, remember that you’re punching from the back (or the wrong side) of the piece. The other side will be the front (or the right side) of your mat. Turn your work over regularly as you work to make sure your loops are all the same height on the right side. If your loops are uneven, you are either lifting your needle up too high or not punching down all the way.
3. You’ll be using two stitch sizes: 4 spi (stitches per inch) and 6 spi.
• Punch at 4 spi for filling in.
• Punch at 6 spi for the outer border, outlines, and single lines.
PUNCHING
1. First punch one row of light blue as a border to outline the square “sky.” Punch right on the black line at 6 spi.
2. It’s best to establish details and outlines first, all of which will be punched using 6 spi. Begin with rust to outline the wings, antennae, legs, and the center of the flower.
3. Next, punch with yellow: the stinger, bee stripes, flower petals, and most importantly the smile!
4. Use 6 spi for the whites of the eyes, and to outline the white petals of the flower. Use a fill stitch (4 spi) for inside the white petals and the inside of the wings.
5. Outline the black areas of the bee’s body with 6 spi, and fill with 4 spi.
6. The green stem is punched using 6 spi.
7. And finally, three punches will make the little red nose.
8. Punch the remaining background “sky” with 4 spi. Resist the urge to make small stitches when you get into tight spots. This is called over-packing and will make your mat lumpy. Equally important, don’t make your stitches as big as 3 spi or you’ll have gaps on the right side of your mat. Try your best to use 4 spi for all of your background.
FINISHING
1. First, tidy up the front side of your mat. It will look messy with long yarn ends (or tails) sticking out and you may have some uneven loops. Many of your loops won’t even be in the right place. Don’t despair! Everyone’s work looks like this before the final tweaks!
2. Now it is time to snip and poke.
• Snipping: Before you take your mat off the frame, working from the front (the finished loopy side), cut off all the ends that are longer than the loops. If you have some loops that are too tall you can cut them so they’re the same height as the other loops.
• Poking: Many of your loops will be where they don’t belong. This is normal. Use the point of your scissors to corral any errant loops, pushing them into place until the loops are where you want them.
3. Now you can hem and finish the mat as a wall hanging.
Materials List
- #10 regular Oxford Punch Needle
- Monk's cloth or suitable foundation cloth
-
3- or 4-ply rug yarn in the following colors:
- light blue
- yellow
- green
- red
- black
- white
- rust
Additional Images:
-
Materials gathered, and ready to start. First, punch a row to outline the sky.
-
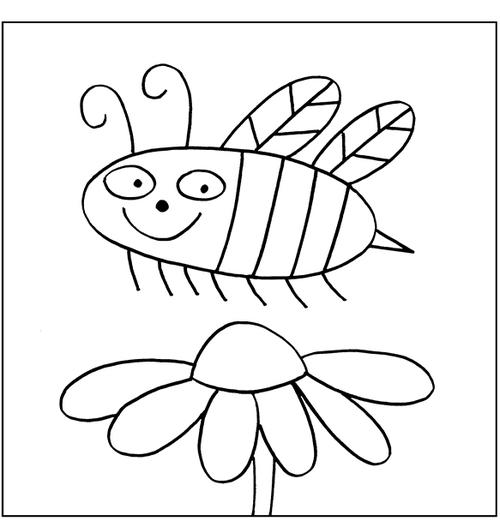
Busy Bee, © Isa Beniston, 2018. For a mat 8" x 8", enlarge this pattern by 125%. For personal use only.

International Punch Needle Rug Hooking Day!
International Punch Needle Rug Hooking Day is April 13! Are you participating in International Punch Needle Rug Hooking Day? Don’t forget to share your work on social media using the hashtag #IPNRHD. Show us your Busy Bee, or whatever else you are working on. Happy punching!
About the Author:
Christie Beniston is a public artist based in Solana Beach, California. Her commissions include the San Diego Airport, Lucille Packard Children’s Hospital, and Los Angeles Metro. Always a student of design and craft, Christie received her certification as an Oxford Instructor in 2017, when she opened PUNCH!, a studio offering supplies and creative space for teaching the exciting craft of punch needle rug hooking. www.punchrughooking.com
Read NextHooked on Christmas Trees