
Bird in Paradise
A design to hook or punch
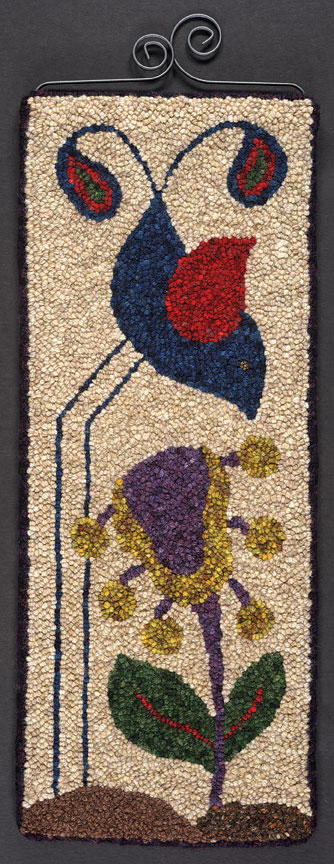
Bird in Paradise, 9" x 24", yarn punch hooked on monk’s cloth. Designed and hooked by Angela Jones, Raywick, Kentucky, 2012.
My pet bird, Burrito, is a constant source of inspiration and entertainment. This Burrito-inspired piece is perfect for punch needle, or it can be hooked in the traditional fashion. I’ve given you instructions for punch needle with tips along the way for hooking should you choose to hook it instead.
Transferring the design
Monk’s cloth is the preferred backing choice for punch needle rug hooking. The cloth size of 22" x 34" accommodates the Breezy Ridge Rugs punch needle lap frame working area of 18" x 18". For other size rug hooking frames add enough backing on all four sides of the design to accommodate your frame. Transfer the design using your preferred method.
Punch rug hookers work on the back side of the rug and should transfer the design backward.
Traditional rug hookers using wool strips work on the front of the design and should transfer the design as it is.
To prevent fraying, serge, zigzag, or tape all edges of the cloth.
Punch hooking the rug
Gauge per inch for this rug: 6 or 4 running stitches per inch (spi); 9 staggered rows across filling in
Border
All borders should be as straight as possible. Punch 2 rows (6 spi) of dark purple for the outside edge border. This step helps hold the rug’s shape.
Background
Outline everything in the rug with 1 row (6 spi) of beige. Next fill the background with staggered rows of 4 spi. Follow the contour of the design.
Wing
Outline the wing in red with 6 spi. To create a nice sharp point, fill in with a continual row of 4 spi that spiral inward. Start this row at the top, almost in the point. Punch, following the shape around, until you are almost back to the point. Do not hook into the point; round off the corner with 3 or 4 stitches, leaving the point open. Continue spiraling inward until the wing is filled in. Remember to stagger the stitches. Then go back to the point and fill in with a few stitches.
Bird
Punch 1 row of blue for each leg (6 spi). Outline the bird’s body in blue with 6 spi. Start and stop in the same hole. Fill in the body with staggered rows of 4 spi. Remember to round off those corners and spiral inward. Go back and fill in points with a few stitches.
Work the bird’s tail colors in blue, red, and green. First outline the whole tail with 1 row (6 spi) of blue. Start underneath the quill line at the top point of the teardrop, continue around the teardrop and then down the quill line to the point, turn your needle while it is down in the cloth, then start up the other quill line and around the other teardrop, stopping where the teardrop point meets the outer quill line. Next punch 2 rows of red (6 spi). Now outline the center in green. Punch 1 row (6 spi). Fill in the remainder with staggered rows of 4 spi.
Flower
Outline the outer edge of the flower with 1 row of gold (6 spi). Fill in the remaining area with staggered rows of 4 stitches. Follow the contour of the flower.
Continuing with the gold, outline each petal circle with 1 row (6 spi). Start and stop in the same hole. Fill in with a row of 4 spi that spirals inward. Don’t forget to stagger your stitches. (Imagine buttons for the petals instead of hooking them.)
For the flower center, outline the outer edge with 1 row of lighter purple (6 spi). Fill in with staggered rows of 4 spi. Follow the contour of the design.
The small flower stems are lighter purple. Punch 2 rows side by side (6 spi) for each little stem.
Use lighter purple for the large flower stem as well. Outline the stem with 1 row (6 spi). Begin at the bottom of the stem. Hook up one side, across the little space at the top, and back down the other side. The down row should meet at the V and line up with the other row. At that point continue side by side until you reach the end of the design.
Leaves
Always hook the smallest lines of an object first. Punch each vein with 1 row (6 spi) of red. Outline the leaves in green and then outline both sides of the red vein (6 spi). Fill in the leaves with staggered rows (4 spi). Follow the shape of the leaf.
Ground
Use brown berber for the ground under the flower. Outline the edge with 1 row (6 spi). Fill in with staggered rows (4 spi). Use Moorit (red brown) for the ground under the bird.
Add a little interest to your piece. Do you have a little skein of luscious handspun, a ball of leftover novelty yarn, or several different color skeins of tapestry yarn? As long as the yarn doesn’t snag in the needle, any combo can be used. I added interest by placing 3 strands of 2 ply sport weight yarn in the needle at the same time. The fibers are Shetland lamb, kid mohair, alpaca, and silk. All fibers are from my stash except the silk.
Outline the edge with 1 row (6 spi). Fill in with staggered rows (4 spi).
Removing the rug from your frame
Punched rugs, when released, will naturally roll back toward the center of the frame. Have patience when removing loops out of the grippers.
One hooked section in the grippers
Release the tension by lifting up the backing on the other 3 sides. Roll the rug out of the grippers.
More than one hooked section in the grippers
Start by working in a corner. Pull the rug straight out from the frame then lift up while pulling the rug back up over the grippers toward the center of the frame. Once a corner is free, much of the tension will be released. Work from that corner down one side of the frame, pulling straight out, lifting up, and pulling back up over the grippers. Remove the rest of the rug by rolling it back and pulling it out of the grippers.
Finishing the rug
A punch hooked rug naturally rolls when taken off the frame. If you squeeze and roll the rug with one hand and glide the other hand across the tops of the loops, they will feel soft and smooth, and you can see neat rows of loops in a straight line. That is my “right off the frame fantasy rug!”
In reality, my “right off the frame” rug looks and feels like a knotty log having a bad hair day. Search your rug for these common problems and take the time to fix them before you call your rug done.
Problem: A loop punched inside another loop
Solution: Using a knitting needle or whatever pointy tool you prefer, untangle the two loops and push the loop back where it belongs or snip off that stray end (Tip: use a frame cozy to protect your hands and arms and keep yarn from snagging on the grippers).
Problem: A longer loop above the pile
Solution: Tug on the loops on each side to even it out.
Problem: An extra-long loop above the pile
Solution: Pull out that section and punch it over, or snip it off.
Problem: Loops are not straight.
Solution: Poke the loops back where they belong. Roll, touch, poke, and snip in one direction and then the other direction.
Finishing a rug takes time, but it is well worth the effort. It reminds me how forgiving punch needle rug hooking is and forces me to critique my technique every time I complete a piece.
Pressing and hemming
Protect the surface of your work area with quilted heat resistant cloth (do not press on good wood furniture). Place your rug face up on the cloth. Saturate a towel with cold water, and wring it out. Lay the wet towel on top of your rug. Set the iron on high. Place the hot iron on top of the wet towel, and apply pressure for about 15 seconds in that spot; move to the next spot, repeating until the whole rug has been steam pressed. Steam press the whole rug in one direction then in the other direction. Lay the rug flat to dry.
A nice, simple 1” hem with mitered corners works well for punch needle rugs. The backing fabric should not show when the rug is lying flat. Hem the rug using button and carpet thread and a strong needle. Be sure to go down into the foundation, not just into the stitches on back. Leave the mitered corners open at the top to create a sleeve for the dowel hanger. Press again, and lay the rug flat to dry.
Final touches
1. Shear. A yarn punch needle rug gets fuzzy from all the punching, poking, and snipping. Removing the fuzz will brighten up the design. I use sheep shears dedicatedfor shearing rugs. Battery-operated lint shavers or bent-handle scissors also work well.
2. Give the bird sight. Wait until you have completely finished the piece to add the eye. Beads, old buttons, and simple French knots are easy, simple eyes for a hanging. Sew your choice in place using button and carpet thread. Be sure to hide the waste thread.
3. Document your work. Add your name, address, and date.
4. Hang. Insert a dowel into the sleeve.
Angela Jones is the owner of Breezy Ridge Rugs in Raywick, Kentucky. She is a folk art fiber artist dedicated to all types of rug hooking and specializing in punch needle rug hooking. A juried Kentucky Crafted fiber artist and certified punch needle rug hooking instructor, she has been teaching and designing rugs for over 15 years. Visitbreezyridgerugs.com for original designs and gripper strip punch needle lap frames. This pattern is for personal use only and reselling of the patternis prohibited.
This article is from the September/October 2012 issue. To get this exclusive pattern or for more information on our issue, check out our issues page.
Materials List
- Monk’s cloth, 22" x 34"
- Rug hooking or punch (or size to accommodate frame) needle frame
- Oxford punch needle, size 9 regular
- Button or bead for eye, if desired
- Permanent marker
- Button and carpet thread and a needle
- Dowel rod hanger
- Spot-dyed wool rug yarn - 3 ply 1/8" thick, 4 to 5 wraps per inch (see below for exact amounts for each part of the design)
- Background: beige - 12.6 oz.
- Outside edge border: dark purple - 1.9 oz.
- Bird body, legs, tail feather: blue - 2.9 oz.
- Bird wing, veins of leaves, tail feather: red - 1.0 oz
- Flower center, flower stems: lighter purple - 1.2 oz.
- Flower outer, petals: gold - 1.8 oz.
- Leaves, tail feather: dark green - 1.5 oz.
- Ground under flower: brown berber - 0.5 oz.
- Ground details: sport weight luxury fibers knitting yarn
- Ground under bird: Moorit (red brown) - 0.6 oz.
Read NextEwe Who

