Exclusive Pattern: Gears
Optical illusions and lizards
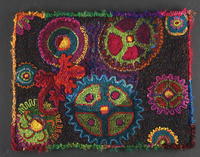
Gears, 18 ½" x 24 ½", #3- to 6-cut wool, Sari silk, and other mixed fibers on linen. Designed and hooked by Gail Dufresne of Goat Hill Designs, Lambertville, New Jersey, 2012.
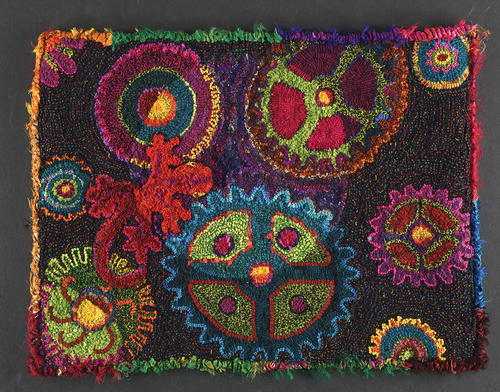
Please note: my hooked design in the photo is larger than the pattern given in the magazine. The pattern provided will make a rug that is 17 ½" by 13 ½".
Renowned quilter Robbi Joy Elkow uses value, intensity (a.k.a. chroma), and contrast in a fascinating way. Defaulting to her engineering background and fondness of high-tech tools, Elkow designs gear and flower quilts using a graphics application.
I was particularly attracted to her gear designs, and lacking the expensive computer software she used, I simply Googled “gears line drawings.” I came up with several gears that I then configured into a design I liked, which allowed me to create an optical illusion similar to those that Elkow creates in her gear quilts.
Transferring the Design to the Backing
Before you begin, serge, glue, tape, or zigzag stitch around the edge of the backing.
Find the center of your backing by folding it in half and then folding it in half again. Make a dot with the marker in the center of the backing (where the fold lines cross) and use your pencil to draw a line between the two vertical middle threads. That will be the design’s centerline.
Draw the outside design lines measuring out from the centerline. Match the line on the paper pattern to the line you have drawn on the backing. I use pencils first then retrace the line with my marker.
Transfer the design from the paper to the backing using your preferred method. I find the light table method the easiest. Or tape the paper pattern to a window and then tape the backing over it. The light showing through the window will allow you to trace the design to the backing using the marker.
Zigzag stitch two rows about ¼" out from the design.
Hooking the Design
Use a smaller cut when hooking smaller areas. It makes it easier to hook, and gives more dimension to your rug. I hooked many of the perimeters of the gears with a #3 cut in a bright color to define the shape of the gear and to pop it out of the background.
Hook the entire rug before sculpting the lizard. The sculpted lizard should not be steamed, so it makes more sense to hook and steam your piece before you sculpt. If you can’t help yourself and sculpt before you finish the hooking, just steam around the lizard as best you can.
Sculpting Elements
Sculpting adds texture and interest. This technique is sometimes called Waldoboro. Waldoboro rugs are known for their deep pile, which is clipped and sculpted so that design elements stand out from the background.
You will need a very sharp pair of scissors to cut and contour your loops. A brush to remove the loose fluff after clipping is desirable but not necessary. The Fuller Brush Company makes a great hairbrush cleaning tool that is perfect for this step, but a soft toothbrush works well, too.
If an area you want to sculpt is very small, hook it with a smaller cut. For a finely shaded flower, for example, you may want a smooth, velvety effect, achieved with a small cut. I used a #3 cut for my lizard. But if you want to sculpt something like a funky chicken wing, use a wider cut and leave the loops jagged and rough.
Begin with the low edge of the section you will sculpt. Pull the loops as you normally would to the height of the loop width. Hook into every hole (this is one time where packing is a good thing!). Each successive row should be pulled progressively higher until the high point of the sculpture is reached; the top of a lizard’s head or the middle and down the middle of his back, for example. If each row is hooked just a little higher than the previous row you will not have to clip off as much wool.
After completing a section, clip the wool to produce the desired effect. You can remove your piece from the frame or hoop to clip each loop. I often start by just shaving over the top of the motif; then, I go back and clip each loop. Brush or shake off loose bits of wool so you can see the three-dimensional effect. If you get carried away or decide that you want the area to be higher, simply hook in more loops and begin the clipping process again. Think high! Don’t be timid about pulling up the loops.
Steaming
Lay a blanket or towel on a hard surface. Don’t steam on a hardwood floor, as moisture may damage the floor. Good surfaces for smaller pieces are the ironing board or on top of the washer or dryer.
Place the rug, wrong side up, on top of the blanket or towel. Completely soak another towel, and wring it out. Place the towel over the rug. Using a medium to high steam setting, place the iron on the wet towel for a few seconds then lift the iron to another spot on the wet towel. Continue this process until the entire rug has been steamed. No pressure is needed on the iron. Turn the rug over, and repeat. Let the rug dry thoroughly. Repeat the entire process if the rug still does not lie flat.
NOTE: Be careful if you use “mystery materials,” which may have a lower melting point than wool. Nylon and silk can take at least as much heat as wool can, but polyester cannot. If you have used materials of an unknown composition, tread carefully when steaming.
Finishing
Cut off the excess backing then serge, glue, tape, or zigzag stitch around the edge of the backing, leaving about 2" or 3" all around. Fold the corners over and then baste them back. You may wish to re-steam after this step.
I back my work with fabric. Tear two sides of the fabric and then sew those two sides of the fabric to the back of the design. The last two sides will need to be “eased” in as the design will not be totally straight. It is handmade, after all! I was able to sew close enough to the rather irregular Sari ribbon border so that I did not need to do anything else to hide the backing.
To determine the amount of overall wool you need, follow these steps:
1. Determine the area of the design (13" x 17.5" = 227.5").
2. Multiply that number by 5 or 6, or even higher if you hook high (6 x 227.5 = 1365).
3. Divide that number by the number of square inches in a standard yard of wool (1365 ÷ 2160 = .63, or about 2/3 yd. wool).
4. Always allow for a little extra: 3/4 yd. altogether.
To figure out how much wool you need for an individual motif, try this:
1. Lay a piece of wool over the entire motif.
2. Multiply that amount by 5 or 6.
NOTE: We all use drastically different amounts of wool. Keep track of how much wool you use to make your calculations more accurate for future projects.
COLOR PLANNING GEARS
The keys to any effective color plan are value, intensity, and contrast. Learning how to apply these elements to your work is probably the most important aspect of color planning.
Value—Value refers to the lightness or darkness of a color. Whether a color is perceived as light or dark depends on what value is next to it. One of my most influential teachers, Marjorie Judson, reminded us in every class: “No color stands alone.” No value stands alone, either. Everything is relative when you start working with color and value.
Intensity—The same is true for color intensity, which is as important as value. Intensity, or chroma, refers to the relative brightness of a color. In its purest, most brilliant state, an intense color is completely saturated, not diluted by any other color. A color is diluted, becoming more and more neutral, when white, black, gray, or another color is added. Intensity works just like value. It does not matter what color you use to give your rug a bit of pizzazz; what matters is that it is a little brighter, or more intense, than the rest of the wool so that it stands out.
Contrast—between light and dark, and bright and dull—is what makes a design appear. Color may enhance a design but value and intensity establish and solidify the design.
Applying the Principles
The brighter circle overlapping three of the gears and the top half of my lizard and the smaller partial circle in the lower right hand corner were created by manipulating value, intensity, and contrast. The brightest wool used in the rug is within these circles.
I re-hooked one of the gears three times to get the contrast that I wanted. I wanted the entire circle to stand out with the same intensity, so I manipulated the value and intensity of each color to give each the same weight as the other colors.
Even though the two red wools I used for the different sections of the lizard (within and outside the illusory circle) were different enough in value and chroma to work in relation to each other, there was not enough contrast between the outside background and the bottom part of the lizard. I used a real screamer (even for me!) of a hot pink in a #3 cut to make him pop. I did the same thing to several of the gears’ perimeters, using equally bright colors in small doses of #3 cuts.
I used different materials in the background in the illusory circle and the background outside it, but they are relatively close in value. The background in the circle stands out most because I used glitzy yarn to make it shine, thereby vamping up the chroma within the circle.
To learn more about Robbi Joy Elkow read Free Expression: The Art and Confessions of a Contemporary Quilter by Robbi Joy Elkow (Quilting Arts, 2005).
Gail Dufresne is a member of the RHM editorial board, president of ATHA, and a McGown certified teacher who travels from coast to coast giving workshops and classes. She writes frequently for RHM and her work was selected for inclusion in “Pushing the Limits: New Expressions in Hooked Art 2012.” Visit her website atgoathilldesigns.com. This pattern is for personal use only, and reselling of the pattern is prohibited.
This article is from the January/February 2013 issue. To get this exclusive pattern or for more information on our issue, check out our issues page.
Read NextEwe Who