
Elaine
A Rug Hooking Exclusive Pattern
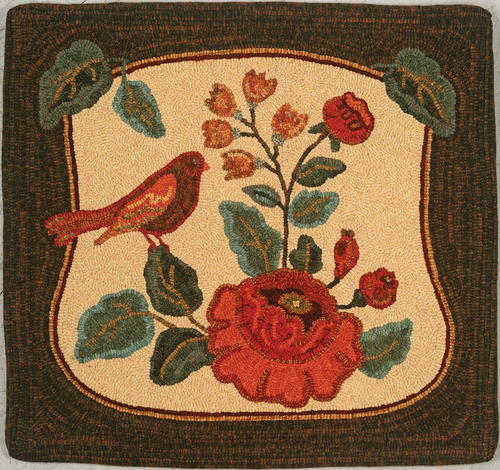
Elaine, 24" x 22 1/2", #6-, 7-, and 8-cut wool on linen. Designed and hooked by Cherylyn Brubaker, Brunswick, Maine, 2011.
When one of my rug hooking students and friend Elaine Holt passed away a couple years ago, she left me an unfinished Waldoboro style rug that was given to her in the 1970s. As a tribute to Elaine, I adapted a few of the rug’s design elements—the rosebuds and bell flowers—and incorporated them in my rendition of this asymmetrical design.
Many of the wools used in this piece are plaids; I find them to be invaluable in my hooking. I separate the colors as I strip the wool and use them to every advantage. They definitely add richness to any piece. A word of advice: don’t be afraid to cut out the part of the strip that doesn’t work.
Enlarge and Transfer the Pattern
Enlarge the artwork to 24" x 22 1/2". The backing of your choice should be large enough to comfortably fit on your frame. I recommend at least 32" x 30 1/2". If you are using bleached primitive linen, a good dark line drawing is visible through the backing without using a light table. If you are using a brown or tighter opaque backing, you’ll need transfer material. A thin transfer fabric called septic paper is available at home repair stores if red dot isn’t available. It comes packaged in rolls in the plumbing section. Transfer the pattern using a permanent marker and secure the edges to prevent unraveling.
Hooking the Pattern
Rose and Buds
Hook the rose first. Even though it isn’t in the center of the design, it is the largest motif. Use a #6 cut because you have five reds to use and the smaller cut will give you more room. Begin by outlining the petals and the rose cup with the sparkliest wool in your red combo. I used a gold/red plaid. Use red glen to make another outline in the petals next to the gold/red. Fill the petals with peach.
Hook the rose cup in a medium red plaid with black lines. I used strips with black lines to give shape to the cup. Add some miscellaneous peach lines to bring the peach color in somewhere else in the rose and to lighten it. Hook the small rose center with a solid gold. Surround it with just a bit of bright green and the green/gold plaid that you’ll use for the leaf vein later. Outline the center with the gold/red plaid. Use your darkest red to fill in around the center. Outline the back petals with the gold/red plaid, and fill them with the red glen.
Hook the remaining rose buds using all of the reds. Work the highlights with the orange-red windowpane from the bell flowers.
Leaves and Stems
Determine your leaf colors. I used two color combinations and moved them across the design. One is lighter and a more blue-green. The other is a brighter, darker green. In all of the leaves, hook the veins and some of the stems in the green/gold plaid. Some are #7 cut, but most are a smaller #6 cut.
The brighter, darker leaves are a green/black plaid. This fabric is a large plaid with a black, darker section that repeats uniformly. Separate the plaid, hooking the leaf outline with lighter green. Fill one side with dark strips, the other with lighter strips. A brown-green windowpane is thrown in for highlights on the left-side leaves and in the top border leaves.
The other leaf combo is a light blue/green plaid and a gray/green plaid. Use varying width outlines of blue/green plaid and fill them with gray/green plaid.
Hook the central stem with a #7 cut of green/black plaid. This dark section also has a bit of red in it. Hook the stem connecting the bell flowers in a #6 cut.
Bell Flowers
Hook the bell flowers in a multi/gold plaid cut crosswise. Form the outline in some of the flowers with an orange-red windowpane. In others, use it for the interior of the flowers. Because the interior has fewer value changes, it settles the plaid down a bit. Add a solid gold highlight in a couple of them as well. Form each flower base with a light and dark textured green.
Bird
Outline the bird using red glen (#6 cut). Hook the bird’s body in Christmas plaid—a brown with touches of pink and red. Hook the beak and wing with peach; gold accents the wing. The crazy plaid used to hook the bell flowers has a large stripe of green and a bit of blue-green. Use that same color as the highlight on the wing and on the tail. The tail incorporates the gold/red plaid and the orange-red windowpane. Hook the eye with a small piece of green, and add a black highlight of wool thread. (It may be changed later to a bead, since this will be a wall hanging.)
Central Background
Hook the background entirely in a textured gold heather—mostly in a #7 cut. Filling small spaces may require a #6 strip. Carefully outline all of the motifs and border. Rather than simply hooking in a contour fashion over and over, fashion new shapes using a grid of curved lines dissecting large areas.
Finishing
Zigzag stitch about 1/2" from where you will finish hooking to prevent unraveling. Do not cut the backing yet! Apply a 3" strip of brown plaid wool, similar to a garment facing—right side to loop side—before hooking the border. First tear the wool in the direction that gives you the most length. (A good wool will tear in either direction.) Seam it together, then sew it in place by machine, lining up the strip edge with a beginning folded seam allowance, wrong side up, to 1/8" past the drawn pattern perimeter. Carefully sew a 1/8" seam, pivoting the machine foot at the rug corners. I place a straight pin on the pattern to mark the corners as they approach. You may have to go back in and resew a couple of areas to straighten it. Then, complete the hooking.
Border
Hook a line of dark red plaid in a #7 cut, followed by an equal size of amber plaid to begin the border. Use brown plaid to fill in the rest. Create echo lines with the lighter strands of brown plaid. If you have already applied your wool finishing strip, hooking the corners can be tricky. Pin the strip out of your way, and hook as closely as you can to the binding.
Press and Finish
When you are finished hooking, lightly steam the rug, loop side down, to make sure the hooking will lie flat. Check for areas that need to be reworked. Carefully trim the rug backing to the zigzag stitching. Fold the wool tape to the back, but not too tightly. I like to leave a bit showing. Hem stitch, folding the rough edge of the wool under, mitering the corners. Steam press again, and let it dry on a towel.
Done! Magnifico! Elaine would love it.
A Tribute To Elaine
In 1996, when I was just beginning to teach rug hooking, Elaine Holt from Georgetown, Maine, was one of my first students. She had started hooking many years ago, but life had gotten in the way. In her late 70s now, she was ready to pick it up again. And boy, did she ever! Over the years Elaine hooked many pieces. She was a joy to be around and a prolific rug hooker. Her rugs have a painterly look with a wonderful color sense. She hooked original designs, usually of landscapes and houses near and dear to her heart. Elaine aged gracefully, and in her later years, her daughter, Susan Dufault, from Hudson, New Hampshire, took up rug hooking as well, accompanying her to class. Sadly, Elaine passed away in her sleep in the fall of 2010. We sorely miss her. Susan is now finishing the few rugs that Elaine hadn’t quite completed. Elaine is a tribute to my wonderful friend.
Cherylyn Brubaker is the owner of Hooked Treasures, Brunswick, Maine. She designs rug patterns, teaches workshops, dyes wool, and finds time to run races, cycle, and knit. Her work has appeared in Celebration three times. Visit http://hookedtreasures.com. This pattern is for personal use only and reselling of the pattern is prohibited.
This article is from the June/July/August 2012 issue. To get this exclusive pattern or for more information on our issue, check out our issues page.
Note: Wool is #6- and 7-cut
Read NextEwe Who

