Exclusive Pattern: She Painted Her Whiskers Red
Hook a whimsical pillow for Christmas

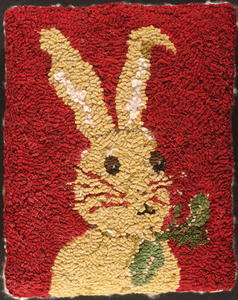
She Painted Her Whiskers Red, 13" x 15", #6- and 8-cut wool strips on linen. Designed and hooked by Sharon Smith, Walnut Creek, California, 2014.
Materials List
-Medium rug hooking hook
-Hoop or frame
-Scissors
-Red hand-dyed sparkly wool, creamy vanilla wool, white artisan-crafted hand-spun yarn, touch of brown and black wool; green hand-dyed wool (supplied as a kit)
For pillow
-bulky or thick-and-thin off-white yarn (about 3 yards)
-a red wool backing fabric
-stuffing (may use leftover wool worms)
This delightful holiday bunny is hooked with an artistically “impressionist” look. In other words, it is not meant to look realistic. The rabbit has soft, broken edges so the piece looks more like a painting or watercolor than a finely hooked piece. Here, the aim is not perfect hoops and straight lines following straight lines. If you prefer neat rows of perfectly formed hoops and a smoothly hooked finish, skip my directions. I’ll explain my method here, but, please, hook as you wish.
HOOKING THE BUNNY
I don’t begin by outlining. Instead, I use a meandering type of hooking, moving in slightly off-kilter directions. It’s not exactly higgledy-piggledy, but rather moving in one basic direction—in this case southeast—in a meandering kind of way. Rows aren’t lined up. Hoops can turn and even go sideways.
Take a look at the left ear of the rabbit. The tip is hooked in a kind of jumbled thick-and-thin, high-and-low combination of strips in uneven rows. In actuality, some of the strips are #8 cut and some are #6 cut. I sometimes hook in a random, directionless manner and then go back and fill in with a #6, or smaller, cut strip. Also, the edges can be filled in or given wiggly shapes by mixing sizes or adding little pieces later. On the edge of the bunny’s face, notice the tufts of white. Those are little pieces of yarn tucked in over an eye, below an ear, or on an edge.
With #6-cut red wool, hook the whiskers in place. Note on the right side of the bunny’s face, the whiskers become white against the red background. I usually hook smaller things like these whiskers in place with practice wool and then go back later and correct them. I pull out the practice hooking and replace it with new wool. Try the same with the hint of a nose and the small mouth.
The oval eyes are brown on top and charcoal on the lower part, with a tiny white (highlight) spot in the lower middle portion of the eye. After finishing the rabbit in the vanilla wool, cut #6 cuts of slightly darker gold wool. Sneak these between rows to simulate wrinkles. Note the darker gold is used on the right ear fold at the top and as crease lines around the neck. Use these very sparingly so they become “hints” of color, not something that will scream, “I am a crease!”
Leave space in the ears and hook them with the white yarn last. The yarn can cling to the wires of your frame, so it is best to put it in last. This should be hooked unevenly in size, width, length, and height to look more natural.
HOLLY LEAVES
When I do an outline, I usually add it last. That is the case with the white highlights around the edge of the holly. Hook the green leaves and stem. Then go back and carefully push in the outline in white. This outline around the green holly leaves is purposely not hooked in a solid line. Instead, keep some of the hoops quite low and others higher. Skip some part of the outlining and let your eyes fill in the holes. Now note that I snuck in some darker gold to separate the leaves and make one slightly darker.
BACKGROUND
I cut the metallic-infused wool with my Townsend cutter. I realize that some people believe this will dull the cutter heads. I do it anyway because I don’t think I’ll live long enough to notice the dulling of the cutter heads. All of the strips are cut in #8 cuts. I do have some spare #6 cuts on hand in case I see any holidays later on.
Trim the linen to 11/2" from the edges and buttonhole stitch or zigzag stitch the edges to prevent unraveling.
PILLOW
Cut a piece of wool fabric that matches or coordinates with your rabbit background to the size of your hooked piece. Machine sew the backing fabric to your hooked piece by placing them face to face and stitching close to the edge of your hooking. Use a zipper foot if you have access to one. Leave about a 5" opening on one end for stuffing.
Turn your piece right side out and stuff it. I used worms, but you may prefer a soft fiber stuffing available at craft stores. If you use wool worms, make a lining for the pillow so that all the wool lint and dust will be kept inside the lining.
This article is from the November/December 2014 issue. To get this exclusive pattern or for more information on our issue, check out our issues page.
Read NextEwe Who