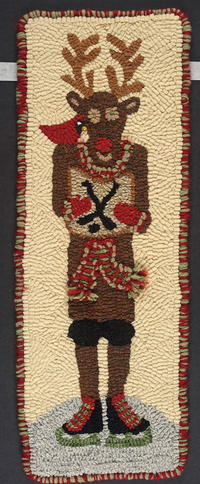
Moxley Sampler
A Rug Hooking Exclusive Pattern: Easy techniques for simple shading
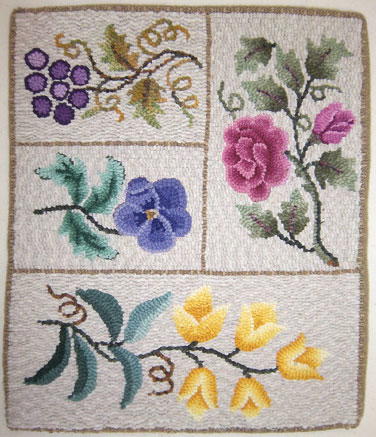
Moxley Sampler, 14" x 17 1/2", #4-cut wool on rug warp. Designed and hooked by Stephanie Allen-Krauss, Montpelier, Vermont, 2010.
Moxley Sampler was designed last year for a shading class. Small and colorful, it offers basic hooking techniques that any rug hooker can try. Better still, the four-section pattern incorporates the designs of my family's wooden stamping blocks. I've always loved working with these wonderful heirlooms that my great-grandmother, Philena Moxley, used during the late 1800s to create embroidery and rug hooking patterns in her Fancy Dry Goods store in Lowell, Massachusetts.
Getting Started: Background Choice
Should it be light or dark? Different colors in each block? I don't specify the background so that you can select what pleases you. I encourage you to go to your own stash and see what you already have.
Decide on your background before you begin. Remember, light values may not show up as well on a light background, and the same goes for dark values on a dark background.
Strips and Dyeing
I used #4-cut strips. They hold together better than a #3 and give me as much shading as I want for this project.
I recommend gradation swatches. These wools are hand dyed in multiple shades (or values) of one color. Gradation swatches can have as few as three values and as many as twelve to sixteen values, but for this project, we'll use a five-value swatch. Each value has a number, and each diagram is numbered to show you where to hook each value. The numbers correspond to the values, light to dark, 1 to 5.
Hooking the Sampler
Grapes and Leaves (techniques: outline and fill, textured wool, and spot-dyed wool)
Outline and fill is one of the simplest ways to use your gradation swatch to achieve interesting coloration. This technique is just what the name implies: one value is used to hook the outline of a shape, then a different value is used to fill inside the outlined area. This method works well for designs that are too small for intricate shading or for primitive patterns that only suggest a representation of an object rather than a life-like copy.
Start by outlining each grape with the darkest value (value 5), then fill the grapes with values 1 to 4, randomly placing each value in a different grape. Don't forget that directional hooking will also help to show the shape and form of the grapes. Hook each grape in a circular direction.
Texture is next. Use the brown plaid to hook the stems, leaf veins, and tendrils.
Spot-dyed wool is another simple way to show a variety of shades and color without getting too fussy. This wool is hand-dyed with splotches of different colors and gives you shades of lights, darks, and blends of color on the same fabric. When the wool is cut and hooked, the different colors and shades naturally form within the design.
Using the spot-dyed wool, hook the leaves by outlining the edges first, then fill within the hooked line.
Tulip (technique: mock shading)
Mock shading is another easy way to start using gradation swatches. Each value is systematically hooked, side-by-side, giving the appearance of shading. Notice on the diagram how the lines are numbered and show the direction in which the loops should be hooked. The numbers correspond to the value.
Follow the diagram for the upper tulip. Hook value 5 (the darkest) from the tip around to the base and then up the other side of the tip, forming a bowl shape. (For this flower, we'll disregard the lines separating the lower petals as drawn on the pattern.) The next strip will be value 4, and so on, ending with value 1 in the shape of the V. To hook the center or top-most petal, start again with value 5, following the V shape, and hook your loops next to value 1 of the lower petals or bowl shape. If you can't get all the values in, just drop value 2 or 3, but make sure you end with value 1 on the tip.
The lower tulip diagram is slightly different. The values are hooked in succession as before, but this time, follow the line separating the bottom petals. The top petal is also different in that the values are hooked in straight lines, instead of in the V shape. There are five tulip-shaped flowers, so experiment with the variations.
Hook the stem using the green and black plaid. The tendrils can be hooked with green plaid or with leftover pieces of brown plaid from the previous lesson.
The leaves are simple but quite effective. Using the green swatch, hook one-half of the leaf in one value, and the other half in another value. Remember that directional hooking will show the contour of the leaf. Note the value numbers on the diagram for direction on where to place each value.
Pansy (techniques: mock shading and directional hooking)
Begin by hooking the center, or triangle-shaped area, of the pansy. Use leftover pieces from the yellow tulip swatch for this part. Use value 1 of the yellow swatch for the two upper lines of the triangle, value 5 of the yellow swatch for the lower line of the triangle, and green spot dye from the grape leaves to fill. You may only get two or three loops of each; don't try to pack too much in.
Next, focus on one pansy petal at a time, beginning with the bottom center petal. Hook the veins (also called the "beard" of the pansy face) in navy blue or black. Use value 1 of the blue swatch to outline the outer edge of this petal and either fill with value 2 or mock shade by hooking value 2 inside the petal edge and then value 3 in the inner part of this petal. Remember that directional hooking will enhance the shape of the petal. Note the turnover on the left petal of the pansy. This is an added challenge but is optional. See the diagram for details on value placement.
Hook the stem with either value 5 of the green swatch or the green and black plaid used for the tulip stem.
Leaves are hooked in yet another way. Take value 5 of the green swatch to hook the leaf veins, then use value 3 around the vein, value 2 next, and value 1 for the outside edge of the leaves. If you've decided on a light background, end with value 2 or take value 4 and hook around the tips of the leaves to accent the edges.
Rose (techniques: mock shading and directional hooking)
The rose may seem more difficult, but if you hook one petal at a time, you can do it. Notice that the lower section of the rose isn't divided into individual petals—that's where we'll begin.
Hook value 1 of your rose-colored swatch on the outer edge line of the lower petal section. Work value 2 inside this line and so on until you hook value 5 on the line at the top part of this petal section. Continue with the other petals, remembering to outline the top edge of each petal with value 1.
What defines this flower is the contrast of each petal with its neighbor—place the lightest values of one petal next to the darkest values of the neighboring petal. See the diagram and colored pictures for additional detail.
To hook the stem, use value 2 of the green swatch and add the shadow line under the stem by hooking value 5. The leaf veins can be hooked with value 4 of the rose-colored swatch to add color balance and interest to the leaves.
These leaves are hooked in a slightly different way from the others. Start at the base of the leaf using value 4 of the green swatch, then hook a few loops of value 3 in the middle section of the leaf, then value 2, and end with value 1 at the tip, unless you've chosen a light background. (In which case, you can hook the tips of the leaves in value 2.)
Green Mountain Hooked Rugs of Montpelier, Vermont, is owned and operated by Stephanie Allen-Krauss. The business has evolved over the past 30 years to include a year-round, fully stocked shop in Montpelier where classes are offered, as well as custom dyeing and rug repair. Classes are also offered annually in June at Green Mountain Rug School and in September at Fall Foliage Fiesta. For more information and to shop online, visitwww.GreenMountainHookedRugs.com. This pattern is for personal use only and reselling of the pattern is prohibited.
This article is from the September/October 2011 issue. To get this exclusive pattern or for more information on our issue, check out our issues page.
Read NextEwe Who