
Dabbling With Nylons
The Benefits of Working with a Fun and Funky Fabric
While I spend most of my rug hooking time using 100% wool fabric, when I dabble with other fibers, my preferred alternative is a nylon potholder loop. Sure, I’ll use a bit of silk, fleece, funky yarn, and even some cotton here and there, but none of those fibers have the same allure to me as a well-colored nylon potholder loop. That’s probably because I imprinted on fiber art as a child while making potholders with nylon loops. And, although I did have some well-meaning relatives who would gift me with bags of cotton loops on holidays, even at the age of eight, I was a discriminating artist who could spot an inferior product when I saw and touched it.
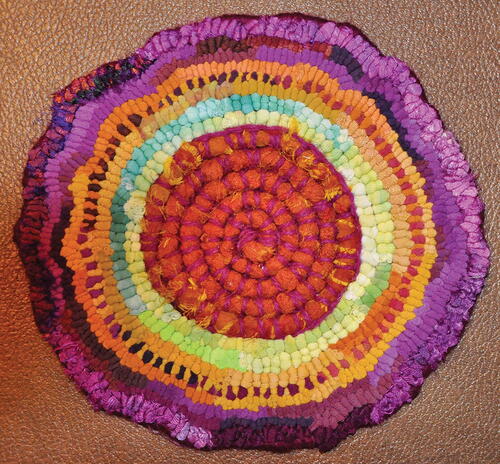
Carnival Paws Mat
-
8" x 10", nylon loops on bleached primitive linen. Designed and hooked by Gene Shepherd. This project was designed specifically as a nylon project since mixed cuts are very effective for most of the design elements. In fact, they give it nice wonky look.
-
While cotton-givers got a cotton potholder back as a gift, most of their inferior loops were consigned to the bottom of my closet as I did not like using them at all, in spite of the fact that their insulating quality made for a better heat-shielding potholder. Even though I was taught to be polite, I did not want to waste my time or degrade my business (I financed my social life, grades 3 through 6, by selling potholders) by using an inferior looking product. To this day, I like the sheen of nylon, woven or hooked.
In the historical fiber art record, nylon is a latecomer. Developed in a DuPont lab during the 1920s, original nylon is a family of synthetic polymers, meaning it did not start out with any organic material. DuPont experimented with various ways of using it for several years, waiting to introduce what eventually became known as nylon at the 1939 World’s Fair in Queens, New York. However, its star didn’t really begin to rise until World War II, when alternative fabrics to cotton and wool were needed for both war and domestic uses.
During this time, it came into its own, especially after producers began blending other fiber components, such as polyester, spandex, and cotton, to improve nylon’s usefulness. Given the fact that rug hookers have a long history of using leftover fabric in their hooked rugs, it’s easy to see why nylon did not start showing up in hooked pieces until after the war, in the late 1940s.
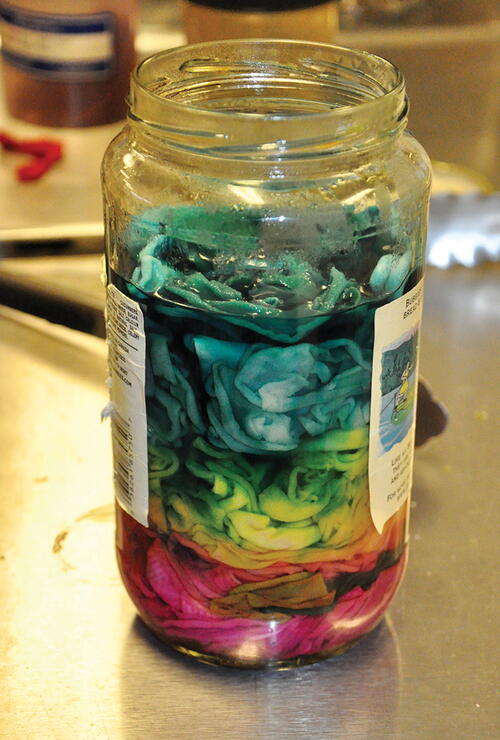
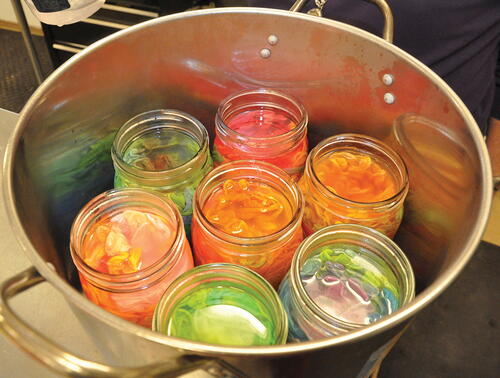
ANYONE CAN DYE NYLON
There is nothing too fancy about recycling used glass jars for dyeing loops. This batch, made with PRO Chem 808, 135, and 733, produces a nice mix of colored loops. By stacking and not stirring, you can produce both pure and blended colors.
-
Get some used quart jars like those that pickles, sauerkraut, and mayonnaise come in.
Using this method, you can make several completely different colored collections of loops in one batch. -
For multicolored loops, mix up 3 or 4 separate colors, per jar, that will suit your need. Each color should be in its own measuring cup: Use 1/32 to 1/16 tsp. of dye, depending on the depth of color you want, plus 1/4 tsp. citric acid to 1 cup of boiling water. When selecting different dye colors for one jar, give some thought to your selection and stacking order. For example, three layers using red>yellow>blue will produce, when done, red, orange, yellow, green, and blue loops. Blue>red>yellow would produce blue, purple, red, orange, and yellow but no green
-
Using mixed colored loops out of the bag, place one big handful of loops into the jar.
-
Pour in the first mixed color and tamp the loops into the dye, making sure the loops are initially immersed. Some will probably pop back up, but that is OK.
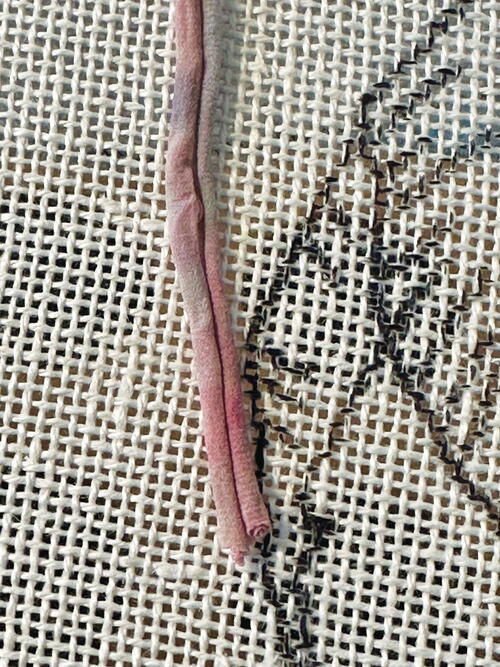
Nylon loops out of the bag or pot are usually an inch or more wide and rather flat. Before hooking, they will need to be stretched. -
Grab a second handful of loops and place them on top of the first layer. While you should tamp them down some, don’t overdo it, and don’t stir. Once tamped, pour in the second dye color and gently tamp down as before, trying not to disturb the first layer
-
Repeat the process for the third and, depending on room, fourth colors.
Once the loop is stretched, formerly flat widths constrict into a tight, skinny rolled strip. One side will have a smooth solid look, while the other side with show the open space between the two outer rolls. -
Should you want more of one color than another, you could do an entire jar of that color. However, I would suggest you might consider, for a jar of red, to do the above-mentioned process with two or three slightly different reds. It makes for more interesting loops.
-
Once all your jars are filled, cover each one with its own layer of plastic wrap.
-
Place the jars, upright, on a rack in a pot of water. Make sure the water goes up the side of the jars.
-
Bring the pot to a boil and cover with a lid. When the water boils, set the timer for one hour. Add more boiling water when levels get to mid-jar.
-
Allow finished jars to cool down in the pot.
-
When loops have cooled completely, rinse with clean water.
-
Place the rinsed loops in a knotted pillowcase and run it through just the spin cycle of your washing machine to remove any excess water.
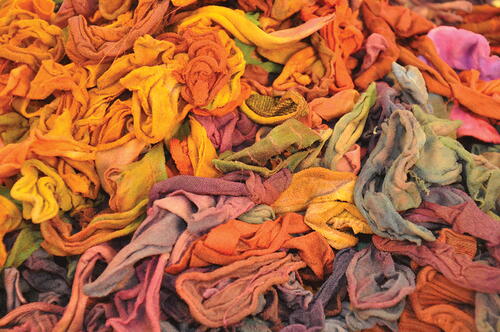
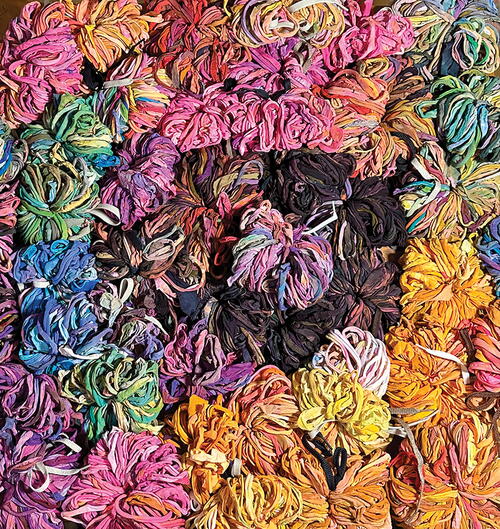
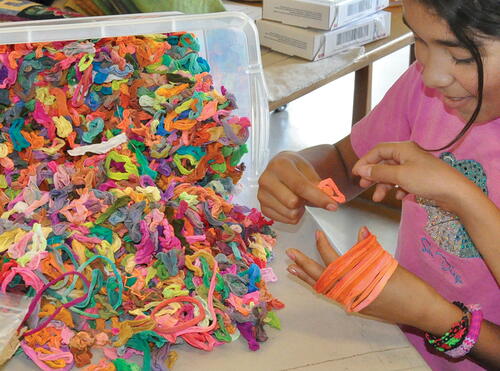
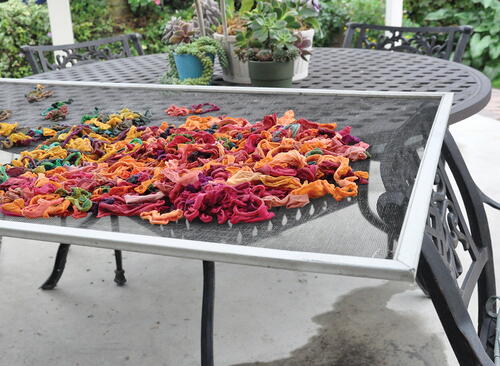
As dyed loops come out of the jar in mixed colors, they usually go unsorted, from drying screen to basket, not getting sorted into color groupings until needed. To sort, it’s easy to pick through the stash, placing wanted colors over one’s hand onto the wrist until it’s a full arm band of colors. As this can be quite fun for both children and adults, I’ve had as many as three generations of my family sorting color groups this way at one time while I continued to hook. -
Place the loops on a flat surface to dry.
Window screens are great racks for drying loops. As a word of caution, don’t put them outside to dry on a windy day! -
For other tips on dyeing nylons see my book Prepared To Dye.
NOT-SO-LOOPY BENEFITS
I never thought of using nylon potholder loops in my hooking until I discovered that the same acid-based dye we use to dye wool and silk also works with nylon. This was a revelation to me since it meant I could turn bags of not-so-attractive nylon craft loops—bags full of mostly white loops, plus a few other overpowering neon colors—into any color I wanted. While that novel application provided me with some new options for multifiber pieces, I didn’t fully grasp the potential until my next rug hooking class with children, which, as always, had to be done on a shoestring budget. The more I worked with the fiber, the more benefits I found.
Nylon loops are a cheaper alternative to wool fabric. That can be a big plus when you are working with children or beginners, who are often very cost conscious. A 16-oz. bag of nylon loops is approximately equivalent in weight to 1 1/3 yard of wool, yet it sells for about a third of the price. Although I usually buy bags of white loops with some mixed neon colors, bags of solid colors in several different options are also available for the same price.
Nylon loops are both safe and easy to dye with very simple equipment you’ve probably got laying around your house or in the recycling bin. Consequently, it’s a perfect introductory dye class for both children and timid adults.
Since nylon loops come in pre-cut rings, no expensive strip cutter is needed for their initial cut. That’s both child- and beginner-friendly. To prep the strips, all one must do is hook a finger from each hand through opposite sides of the loop, then pull as hard as possible. This stretching exercise will relax and lengthen the loop considerably, as well as cause the sides of the loop to narrow as they tightly roll in, like a scroll. With just one snip of scissors, the loop then becomes a hook-able strip about 10" long.
EMBRACING IRREGULARITY
Bagged cut strips are not cut in uniform sizes. They range from widths of approximately 1" to 1/4 of an inch wide. This means that, after stretching, you’ll end up with a collection of cut sizes ranging from a fat #8 to a very skinny #3 and even a few #2s. This works for me as I often like using different cut sizes when working on very realistic projects. However, some nylon pieces in a bag of loops have been cut on a bit of an angle. This makes those individual loops range from wide to narrow within the loop itself, meaning a stretched piece might go from #6- to a #3-cut in one short strip. Some can even have a slightly ruffled edge.
Some might see the inconsistencies of this resource as a negative. I see it as a quirky characteristic that I can occasionally use, like sari silk, slubby yarn, and roving, to name just a few. If I were looking for a fiber to hook a precise repetitive geometric, I would not use nylon loops. However, since I spend most of my time being overly conscious of every loop, I rather like a good excuse to hook outside the box a little. Knowing I am working with irregular strips means that irregularity is the perfect nylon look. Since nylon loops have special qualities, I choose to embrace them.
-
It’s perfectly fine to use irregular nylon loops for a geometric design if you relax and allow them to do their irregular stuff. It is the perfect nylon loop look!
-
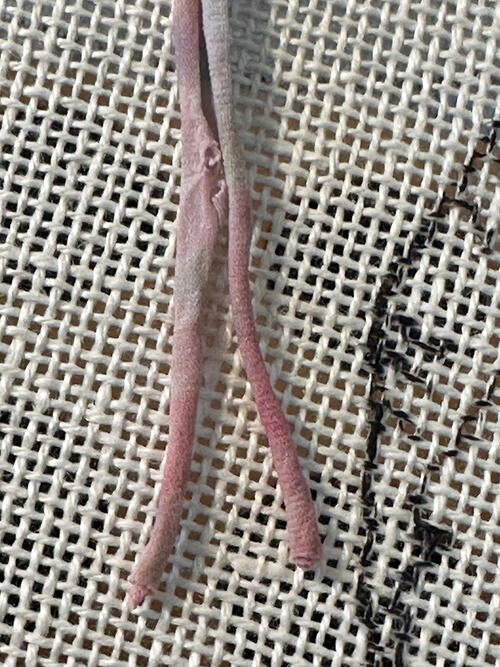
When needing a skinny strip for something special, just hand cut right down the middle space of the two long rolled sides. This effectively divides the strip in half, marking the place to cut.
-
This 4" square coaster was made with a mixture of hand-dyed rug yarn, nylon loops, and sari silk. The crisp, delicate sheen of the nylon is a good complement to the fluffy yarn and fuzzy gloss of the silk. It’s a great beginner project for both children and adults.
-
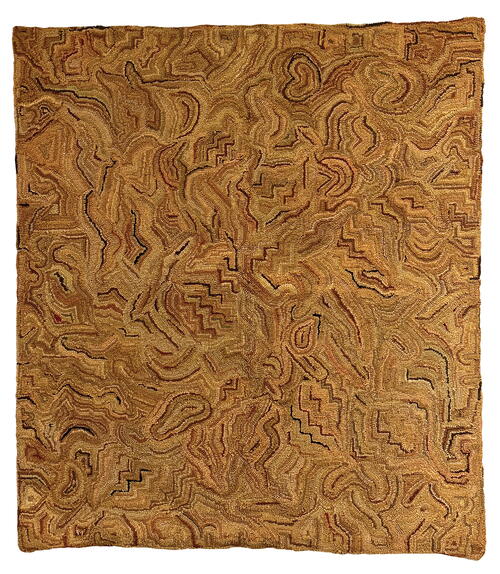
This splendid vintage hooked rug was made completely with as-is nylon fabric (probably stockings) in the late 1940s. The 34" by 38" rug, on burlap, was finished in the old style with a folded edge that was stabilized by hooking through the double layer to the outside edge. From the collection of Gene Shepherd
-
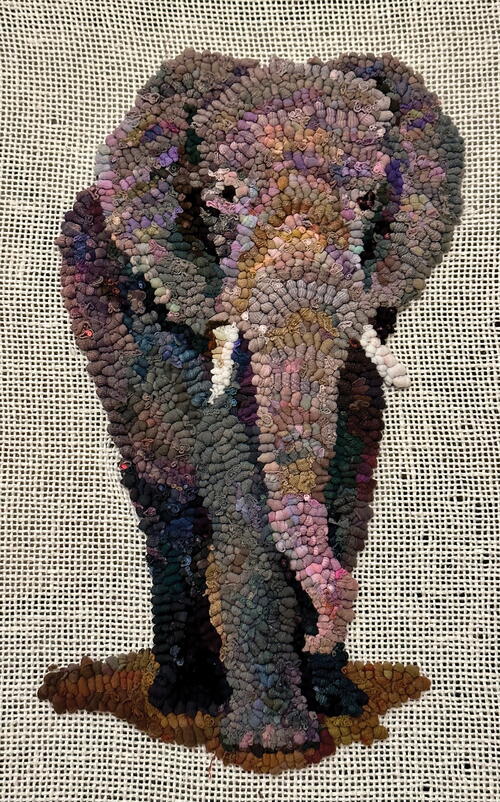
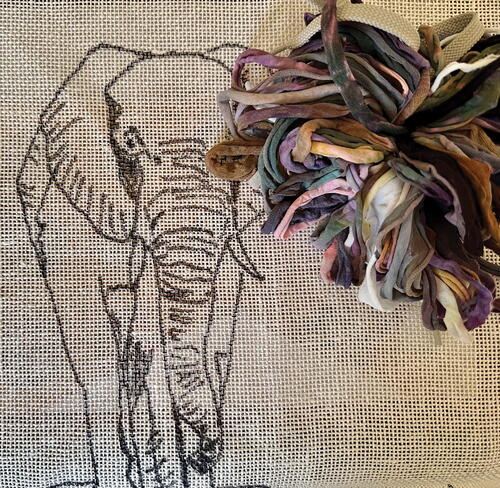
Walking Elephant, approximately 8" x 10 1/2", hand-dyed nylon on bleached primitive linen. Adapted from a photo by Lloyd Heinze, Lubbock, Texas. Hooking in process by Gene Shepherd, 2023.
The subtle qualities of jar-dyed nylon loops are particularly suited to painterly projects. One just needs to be willing to take the time to find just the right pieces, values, and colors. The harder, slightly glossy look of hooked nylon (as opposed to wool) works very well for elephant skin. This piece was created to show nylon’s versatility for this article. Its eventual size and finish are still being determined. -
I dyed nothing special for the elephant, preferring to dig through my stash of nylon loops, looking for duller, muddied loops from a variety of color families. Eventually, I ended up with a large variety of odd colors in a wide range of values. While the grouping may be unusual and even un-elephant-like, it makes for a very effective animal. When showing the piece to my students, most never guess that I used nylon to make it.
-
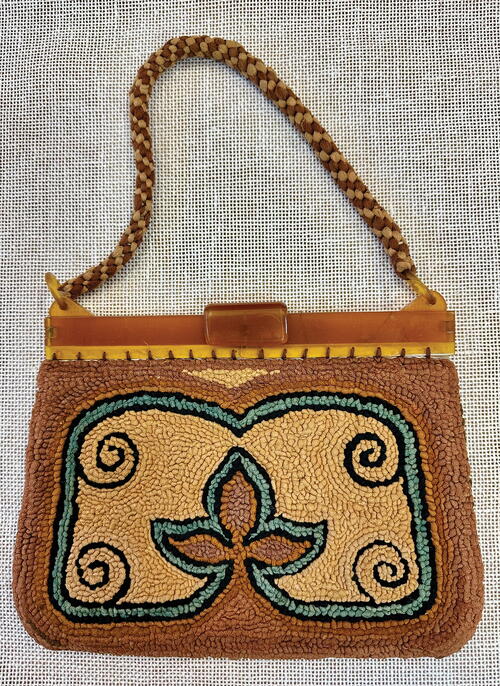
Complete with a Bakelite clasp, this attractive nylon hooked bag was handmade by a skilled artist during the 1940s. From the collection of Barbara Holden. Subtle use of different colors of nylons, probably stockings, make a big impact on the look of this piece.
-
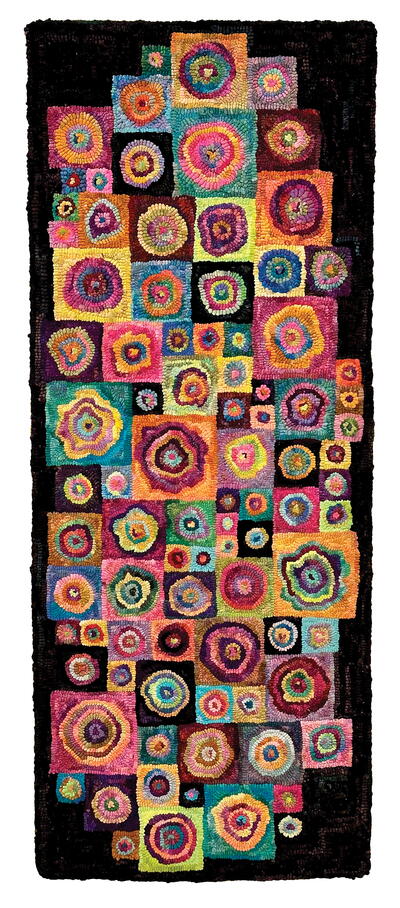
On the Road Mat, 14 1/2" x 36", hand-dyed nylon on bleached primitive linen. Designed and hooked by Gene Shepherd, mainly in California, Illinois, and England, 2010-2023.
The size of this mat was dictated by the fact that, when I needed a piece of backing to quickly demo the hooking of a cat’s paw for a class, it was the closet piece available. As the backing was only 16" wide, it was never intended to be a mat of any kind. Still, after demoing three or four different-sized cat’s paws, someone asked about turning corners. After answering by demoing a couple of hooked squares around some paws, it suddenly became a kind of game to see how far I could go, making and filling squares, with no drawn or pre-planned design. Since most of the hooking on this piece was done while visiting my mother during the last few years of her life, the random irregularities of the piece also seemed appropriate to both the ups and downs and light and dark random moments of that experience. Keeping it funky and irregular was, therefore, both highly symbolic and therapeutic—almost a bit of comic relief. My mother was even able to participate, most of the time, by doing the color hand-sorting for me, thus making it a shared experience. The final size was determined by the size of the backing remnant, as I treacherously filled it until there was just enough edge left to turn over and whip. Although not finished before my mother passed, after letting it sit a few years in the closet, I finally was ready to get the job done in 2023. The whole chaotic, irregular process was appropriate to the circumstances.

Nylon travels light. Since I travel with either a sturdy hoop or a collapsible 11"-square gripper top, I can easily stick either of those in a small tote with a bag of loops, my scissors, and a hook. Not only has this allowed me to hook while traveling all over the world, it was also particularly useful during the years I wanted a work project when visiting my elderly mother at home or nursing home.
Nylon has a special look. There would be no point using nylon if it didn’t look good. Happily, it has a very solid, almost hard look, with just a bit of sheen.
I must admit, and this is from someone who makes his living by dyeing and selling wool, I also like to dabble with nylon because it always presents me with a new and outside-of-the-box challenge. While I don’t need that sort of challenge every single day, or even year, I always know, when I get my donut rings of dyed nylon loops out, that they will give me a project that stretches my creative abilities. RHM
Gene Shepherd began hooking in 1998. He started teaching and writing about rug hooking in 2000 and began making instructional videos in 2005. He has authored three books, numerous magazine articles, and several hours of instructional videos for RHM.

