
How to Photograph Your Rugs: Part 1
Tips to Make Your Hooked Pieces Shine
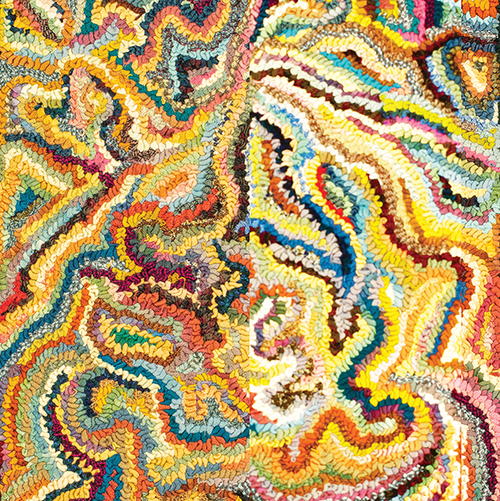
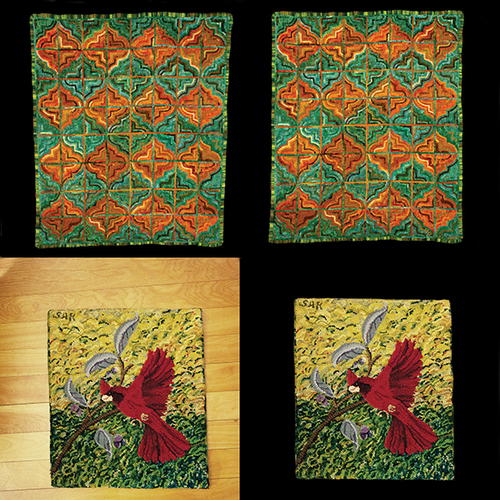
DO make sure your photo is on focus, as shown on the left. Zoom in on your photograph. Can you see the loops clearly defined, as shown here on the left? The right side of this photo shows a zoomed in view of the same rug, slightly out of focus. Also, the right side is over-exposed, too bright.
DON’T judge focus by merely viewing the photo on the back screen of the camera or via a cell phone. The difference in clarity is best seen when viewed zoomed in, and on a computer screen.
Dear Rug Hooking Friends and Colleagues: I love your gorgeous hooked rugs. You take so much care with your designs and executions, creating glorious pieces of art with thoughtful colors, enormous technical skill, and extraordinary artistic vision. Your photos, however, are terrible, whether I see them online via social media, or in various print formats. Yes, I mean you!
When our photographs are poorly done, the world dismisses us and doesn’t take us seriously. Lousy photographs can make even the finest, most extraordinary work appear poorly made and badly designed.
Well-done photographs of your work are essential for submission to juries and publications. They will help your rug-hooking business sell your wool, patterns, and workshops. Most importantly (to me at least), it will help the world see your work in the way it deserves to be seen—as serious art and craft.
Let’s Get Started:
1. Know how to use your gear. I have some unfortunate news. You are going to have to break down and learn how to use your gear. If you have a camera, pull out the manual and read it. If your manual has disappeared, consult Google and search for the instruction manual for your camera; you will find a link where you can download a pdf of it for free. I keep copies of camera manuals on my cell phone and tablet, so I always have easy access.
Learning how to use your gear by way of a manual can be daunting. That is when the Great Oracles at Google and YouTube come in handy. When you hit on something that is confusing, look it up in the manual, then use the Internet to find articles and videos that will demonstrate the information. This is how I learned to master my gear.
2. Prepare your rug to be photographed. When I shoot other peoples’ rugs for juries or publication, I spend more time “grooming” the rug than I do photographing it. This is stuff you won’t see when the rug is on the floor in your home or hanging on the wall. But in a photograph, it jumps out like a sore thumb.
- Go over every inch of that rug up-close, and snip every bit of “hair” popping out between your loops from hairy linen. Use your lint brush and remove all pet hair, dust, lint.
- Fix any stray loops. Are there holidays that need filling?
- Do you have white bits of backing showing between strands of your whipped edge? If your whipping is black and you are in a hurry, grab a black sharpie and fill in the white dots.
- If your rug lives on the floor, spend a lot of time with the vacuum cleaner. Consider getting a piece of screening if you are wary about vacuuming, and place it over the rug. Use the upholstery brush attachment and vacuum through the screen. The screen will keep loops from being caught up in the vacuum.
- Another great strategy is this: turn a rug that lives on the floor over onto a piece of sheeting. Tap away on the back side of your rug. You will be amazed at the sand and grit that shakes out. The sheet underlay makes it easy to capture and dispose of the dirt and grit.
- Are you worried that your loop heights aren’t consistent throughout the rug? Give it a good, solid pressing and they will look great. Get those curling edges to lay as smooth as possible. Block and shape the rug if it is wonky, bubbling up, pooching out, or drifting into an unplanned shape.
3. Prepare a wall for hanging your rug to be photographed. The most glaring and common mistake I see is when a rug has been placed on the floor and photographed by someone standing above. The position of the rug in relation to the camera causes distortion. But much more egregious are the resulting backgrounds comprised of flooring materials.
My favorite “wall” for hanging rugs to photograph is made up of inexpensive rigid foam insulation board (2' x 8"), purchased for about $12 a sheet at the hardware store. Using T-pins, I mount black polar fleece to serve as a neutral background for the rug. Apply the polar fleece so that it is completely smooth, with no draping or sagging. Polar fleece doesn’t reflect light, it absorbs the light. I have tried black woven fabrics; they bounce the light back in a harsh manner. In addition, fleece doesn’t wrinkle. Fleece can be tossed in a hot clothes dryer for tidying up wrinkles and lint, and it washes easily.
It feels counterintuitive that foam would hold the weight of the rugs with mere T-pins, but it works beautifully. I have mounted rugs as large as 8' long with no problem. Bury the T-pins between the loops so they don’t show up in the photo. Space them so there are no sags and bags in the rug. Use gaffer tape on the back of the rug to hold down unruly rolling edges.
Walls painted flat white, off white, and neutral grey also work. I painted a wall in my garage grey and mounted carpet tack strips for hanging rugs. I don’t recommend painting a wall black, because it reflects light. If you want a black background, stick with the polar fleece.
If you are photographing a piece that is 3-D, like a sculpture or footstool, create a black backdrop using polar fleece. One option is to pin the fleece to a wall and have it drape down over a table. Place the footstool on the table. Do not include views of your living room, back porch, chair molding, or anything other than the item and the backdrop. People are often tempted to show their sculptural piece in the context of a room or garden. However, unless you are someone with a background in setting up and photographing a lifestyle or interior design shoot, keep things as simple as possible. Anything other than the object you want to feature draws the eye away from that object.
4. Light your rug. Turn off the flash on your camera or phone. Never use it. Ever. On-board flash throws off hot, uneven light, and looks terrible under any circumstances. If you don’t know how to turn off your flash, consult Google or read your manual. (It is important to know the precise model number. A general query for how to turn off flash on a Canon camera, for example, won’t be helpful because each model, even within the same brand, has different controls.)
The best, least expensive light for photographing your rug is outdoors on a bright, overcast day. Never shoot anything in direct sunlight. Don’t shoot your rug under a tree, and never shoot under an awning or in dappled light. If you must shoot on a sunny day, go to the shady side of the house, and make sure there is no roof over your head. (The foam insulation boards weigh nothing, and are easy to carry around and place in appropriate lighting conditions.)
If outdoor shooting is not possible, invest in some inexpensive full-spectrum daylight bulbs and cheap clip lamps. (Don’t invest in professional lighting because it is expensive and difficult to use properly.) For small and medium rugs, use a lamp on each side, mounted on posts, angled so the light is aimed at the rug from the sides at about a 45-degree angle. Very large rugs might require four lamps; two placed high, and two placed low. Look at your corners. Is the light evenly distributed? Take a test shot of the lighting on the rug. Often, uneven light shows up in the photograph even if you can’t see it with your eyes. If some areas have too much light and others have
too little, move the lamps further away from the rug. The further the light source, the gentler and more evenly distributed the light. Play with the angles to eliminate any areas of splotchy shadows. Are overhead or other light sources interfering with the even light on your rug? For example, if you have track lights turned on in addition to the full spectrum bulb clip lamp, you may find pools of yellow light splotches showing up in your photos. If that happens, turn off those other light sources.
5. Choose your camera. Your cell phone or tablet may be fine for quickie snaps you plan to post to social media. However, if the purpose of your photo is submission to a jury, publication, or print, please use a camera. The best camera is the one you have at hand. Don’t worry that your five-year-old camera is too old or doesn’t have all the latest bells and whistles. It will be fine. The reason I urge you to not use cell phones and tablets for juries and print is that they have sensors and pixels that are not the same size and quality as cameras. Yes, your cell phone may have the same number of pixels, or even more, than your camera. The pixels and sensors themselves, however, are not the same. Keep in mind that what looks good to you often looks terrible to photo editors and book designers. If the phone is your only option, then use it, but still follow my guidelines for prepping, lighting, and mounting your rug.
6. Choose your lens. Do you own a camera that has multiple, interchangeable lenses? How should you decide which lens to use? Often, when people have multiple lenses, they own a combination of prime lenses (lenses that shoot at only one focal length) and zoom lenses (lenses where you can turn the barrel and make the subject come closer to you, or move further away). If you have the choice of either prime or zoom, always choose the prime lens. Lenses that zoom are a great convenience. However, they are never as sharp as lenses with a single focal length. Prime lenses are more likely to be sharp from the dead center of the rug, all the way to the outer edges. Zoom lenses are usually sharp in the center, but they create images that get soft and less detailed as you move to the edge of the frame. With our hooked rugs, we want everything to be sharp.
If you own multiple zoom lenses, select the lens that allows you to frame and capture the scene where you can stand as close as possible to the subject without losing any of its edges off the frame. The closer the front of your lens is physically to the subject, the easier it is for the camera to record the details. However, perhaps you are shooting your rug in a room with odd dimensions, and you cannot get the view you want with your preferred lens. In that case, definitely go with whichever lens will allow you to get the photograph in the best possible light and composition.
7. Use a tripod. The tripod may be your most important piece of gear. I recently reviewed hundreds of hooked rug photographs, and most of the images were slightly out of focus. Many were severely out of focus. I am certain the people who took those images checked the screens on their phones and cameras and were thrilled with how great the images looked. But our eyes deceive us, and the small screen makes it harder to see the imperfections. The great thing about the tripod is that even if you can’t see very well, you can capture tack-sharp images by following the proper steps for using your gear. If you take your rugs to have them professionally photographed, and the photographer says she or he doesn’t need to use a tripod, find another professional!
Our hands aren’t as steady as a tripod. And simply pressing a shutter button causes the camera to move; to the experienced eye, that shows up in the image. The good news is you don’t have to get a big fancy tripod. There are wonderful, inexpensive little tabletop tripods that work very well.
8. Position your camera in front of your rug. To minimize distortion, the front of the camera needs to be parallel to the front of the rug. If the camera lens is perfectly perpendicular to the floor (at a 90-degree angle), but the rug is mounted on a board that leans backwards, the photograph will exhibit keystoning: the top of a square rug will look like it is narrower than the bottom. In addition, the center of the lens needs to be placed so that it is at the same height as the center of the rug.
To find the center of your rug, take two pieces of yarn and extend them diagonally from upper left to lower right corners, and upper right to lower left corners, making a giant X on the rug. Where the yarn pieces cross is the rug’s center. Measure the distance from the ground to the center of the rug as it is mounted for shooting. If that center is 4' off the ground, the camera should be on a tripod at a height where the yarn pieces cross. A simple carpenter’s level will help you determine if the camera and mounted rug are leaning at the same angles.
9. Use a remote shutter release or a timer. Even on a tripod, pressing the shutter moves the camera, so professional photographers use a remote shutter release to avoid camera shake. If you do not have a remote shutter release, don’t worry because your camera has a built-in timer. The timer usually gives you the option of a 2- or 10-second pause between pressing the shutter button and the camera firing. Two seconds is sufficient. This gives you time to remove your hands from the gear.
10. OK, you aren’t going to bother with a tripod because you are just shooting quickie snaps for social media. Hold your camera correctly. Squeeze your elbows into your side. Place your dominant foot a little in front of you. Raise your camera to your eye and gently, but firmly, press it to your face to stabilize the camera. (Of course, you can only press it to your face if there is a viewfinder.) If you don’t have a viewfinder and hold your device at arm’s length to frame the shot, reel in those arms. The further out that you hold the device, the more unsteady your arms will be. Are you extending your arms way out there because that is the only way you can see the rear screen to frame and focus the shot? Go change your eyeglasses! Use a pair of cheap readers. Or tilt your head to accommodate your multi-focus spectacles (like progressives or bifocals).
Hold the camera gently but firmly with your right hand in a position so that your forefinger can comfortably rest on the shutter button. Your left hand should cradle the bottom of the camera. Take a breath, let it out, and gently squeeze the button. Don’t press down, because that may move the entire camera down, causing camera shake, resulting in a fuzzy image. Squeeze, don’t press. Search YouTube for videos on how to hold a camera.
When firing off the camera via a dot on the back of the screen (instead of pressing the actual button), practice using gentle taps. Experiment with using both the button and the dot on the screen to see which works best for you.
11. Manage camera settings. If you are not going to use a tripod, put the camera on full auto settings, but realize that the results will not look as good as your rug deserves. People have disagreed with me on this and sent me photos captured without a tripod they believe are adequate. Those photos have never been adequate. They have always lacked the best clarity. Your rug deserves the best.
a. Set the auto focus point in your camera to dead center. This may require that you change the function in the camera that chooses the auto focus points. How can you tell if the camera is doing so? Look through your viewfinder and press the shutter button half way.
Do a series of different spots appear, spread around the scene? Move the camera to focus on a different scene, and again press the shutter halfway. Do a new and differently positioned set of spots appear? This means the camera is set to decide for you where it thinks you want the sharpest focus. Change your setting to a single focus point set dead center of your view frame. (And I highly recommend this be the permanent focus setting for all your future photography. Cameras often predict incorrectly what it is in the scene that you want to focus on). If you do not know how to do this, consult Google. For example, I would type into the Google search screen: Select single center auto-focus point Canon 5D Mark iii. The result will likely bring you to a variety of written instructions as well as Youtube videos. And you should search your owner’s manual. If your camera does not allow you to change this function, then don’t worry about it.
b. Turn off your camera’s flash. Consult Google for help.
c. If your camera provides the choice between shooting raw or jpg, shoot jpg (or jpeg). (If you are an experienced photographer and know how to work the digital darkroom, then shoot raw. But if you are that experienced, I am guessing you are not reading this article.)
d. Set the highest or largest resolution possible (the greatest number of pixels the camera will let you shoot). This is for print. If you are shooting to post directly to social media, low resolution (72 ppi) works. For social media, follow your camera’s instructions for sizing for the web.
e. Select a quality setting of fine.
f. If your camera allows you to choose between a selection of picture styles, choose either neutral, faithful, or standard (in this order of priority if all three are available options). Do not use the other options like landscape, vivid, or portrait because they will disrupt the colors of your photos.
g. Do not turn on the in-camera options for adjusting sharpening, contrast, brightness, saturation, or hue. Leave them alone.
h. Set the white balance to AWB (auto-white balance). If you are an experienced photographer, you can set a custom white balance.
i. Set the camera to Aperture Priority, usually indicated as “av” in your setting options. (Other options for setting the camera are manual, shutter priority, program mode.) Aperture priority lets the camera do the complex task of figuring out proper exposure.
j. Set your aperture to f/8. This aperture, for most lenses, allows for the sharpest photo.
k. Set your iso to 100, and your metering mode to evaluative (called matrix mode by some camera brands).
l. If your camera has a zoom built in, determine if it is optical or digital. If it is digital zoom, set it so that it does no zooming at all. (Digital zooming crops out pixels and lowers the size and quality of the image). If it is optical zoom, it will shoot at its sharpest quality with the zoom set to a medium lens length, like 50mm. Your viewfinder will tell you what lens length you are shooting at. Please don’t stand far away from your rug and just depend on the zoom to get closer. You want a balance between your camera’s sharpest settings and you physically bringing the front of the lens close to the rug. Set up a shoot and experiment with different lens lengths as you explore photographing your rugs. Some will distort the rug in a weird stretchy way (for example, shooting up close at 15mm). Others will compromise the focus, leaving outer edges blurry.
m. Plug your shutter remote into the camera. Or, set the camera so it will use the 2-second timer to shoot.
n. If your camera or lens has a feature called image stabilization, turn it off when using a tripod. If you are shooting handheld (which I urge you not to do!), turn image stabilization on.
o. If you are using a tablet or cell phone for posting to social media, you will probably be happy with the device’s automatic settings. But test out the possibilities and see if it makes a difference in the look of your images.
NOTE: If your camera only shoots in auto mode, and you don’t have the option of adjusting the parameters listed above, just forge on and shoot with what the camera does automatically (but first turn off that flash, and then check exposure compensation!).
12. Frame, focus, and expose your shot. Position your tripod and look through the viewfinder or at the back of your screen. Press the shutter button halfway until you get focus confirmation. That halfway press focuses your camera on the scene. Look up focus confirmation for your camera model. It can be set as a beep, or as a little light that changes color and/or blinks. This is an essential step; often people press the shutter button without first achieving focus.
The next step in focusing your shot is to make sure it is properly exposed. This means making sure the camera is set so the photo will be neither too dark nor too light. As you look through your viewfinder, or on the back of your screen, there is a line across the bottom of the scene with a little indicator that will show up either in the center, or to the left or right of center. This meter indicates your lighting conditions. You want that little indicator in the center. If it is to the left of center, the photo will be too dark (underexposed); to the right, and it will be too light (overexposed). A dial on your camera will allow you to move that mark back to center. This is called exposure compensation. Your manual will tell you how to use exposure compensation. You must check and adjust this feature even if you are shooting in an automatic mode. Even in auto mode, this dial can accidentally change, resulting in incorrect exposure. (This is why you can’t figure out why some of your photos are too bright or dark, even when you have set the camera to operate fully on auto.)
Now that the view is in focus and properly exposed, go on “border patrol.” Look around all four sides of the edges of the view (through the viewfinder preferably; at the back screen if that is your only option). Is there anything leaking off the edge that shouldn’t be? Is the image straight and symmetrical? Have you filled the frame as much as is possible while also still having a bit of a margin surrounding the outer edges of the rug? Do you have to pick up the camera and tripod and move to correct the framing of the scene? Recompose if need be, and again press the shutter halfway to focus. Repeat border patrol.
Use your camera’s level and grid (available on cell phones as well as cameras) to be sure all is well.
Your camera has indicated through focus confirmation that the image is good. But there is a chance it looks out of focus through the viewfinder. Check that your camera’s diopter is set for your vision. The diopter is a dial that corrects your view through the viewfinder for your vision. It doesn’t focus the camera on the scene. Rather, it is like changing your eyeglasses so you can see the scene. Diopters often accidentally get readjusted and we don’t realize it. Having the diopter set incorrectly is like wearing someone else’s glasses. If you cannot get anything in focus by looking through the viewfinder, check your diopter. Remember that the actual focus for the photograph is unrelated to the diopter. The diopter gets adjusted so you can see the focus for yourself.
13. Release the shutter to take the photo, either with your remote shutter release, or with the shutter button and the 2-second timer. Take the picture. Take multiple copies of the picture, always confirming it is in focus.
14. Check that the photograph is correct. Leave the rug mounted and lit, but transfer the jpgs to your computer and look at them on the full screen. How do they look? Does anything need adjusting? Zoom in on the photo. Can you see individual loops clearly? If the image fills your screen and doesn’t look tack-sharp, figure out why you are missing focus, and reshoot the rug. Do not assume no one will notice. I will notice; so will others. Reshoot the rug as many times as you need. Another pair of eyes can help you verify focus. Ask your assistant specific questions like: “Does the lighting look even? Is the rug crooked? Can you see all the details clearly?”
If you try your hand at taking photos of your rugs and want an unvarnished review of the photograph (not the rug itself; just the quality of the photograph), send me a copy via Facebook’s Messenger and I will be happy to provide advice. Or contact me with a low-resolution image via amwlittenberg [at] comcast [dot] net and I will try to help.
And yes, I mean you!
Dos and Don'ts
Warmest thanks to Green Mountain Hooked Rugs for allowing me to use your family's rugs to illustrate the "dos" and "don'ts" of photographing hooked rugs. Rugs courtesy of Stephanie Allen-Krauss, Lindsay Krauss, Mariah Krauss, Pam Kirk, and the late, great Anne Ashworth. https://greenmountainhookedrugs.com/
-
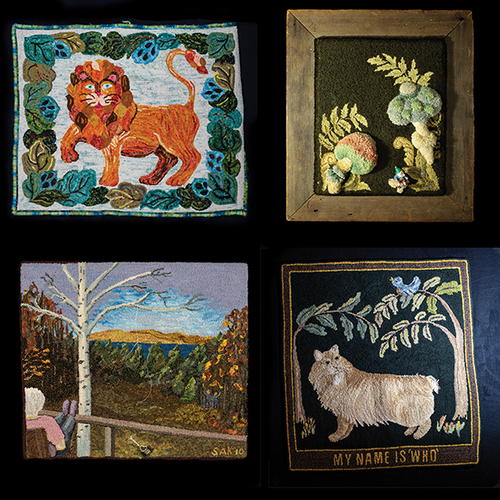
DO center your rug in the photo. Keep your background uncluttered, untextured, unpatterned. Black makes an excellent backdrop for showcasing a composition where the border is in a mid-value (whether the border is hooked or a wooden frame).
DON'T allow any edges of your rug to leak off the edge of the photograph. DON’T photograph your rug tilted. -
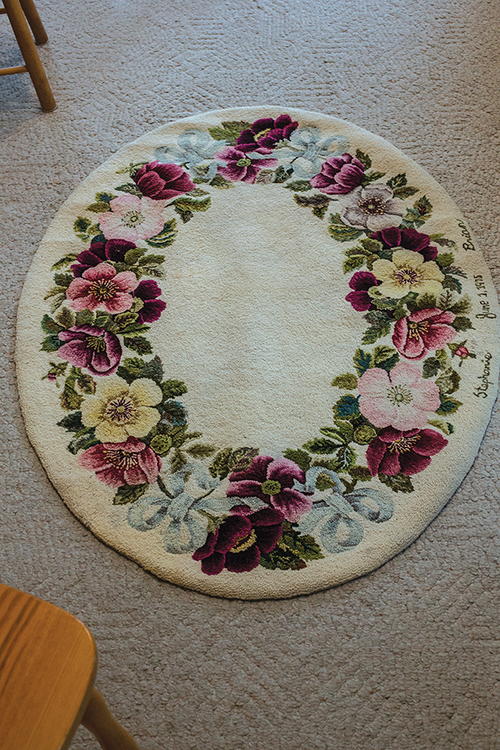
DO make sure the lens is parallel to the rug, and the center of the lens is at the same height (when the camera is on a tripod) as the center of the rug. This helps prevent distortion. (Note this oval rug is the exact same rug that appears as round in the “don’t” photo.) I chose a black background for this photograph because neutral grey and white are both too close in value to the body of this rug.
DON’T put your rug on the floor and stand over it to photograph. It distorts the rug (this rug is actually an oval!). Don’t use your flooring, carpeting, tiles, etc., as the backdrop for your rug. The tones, texture, and value of the backdrop influence how you see the tones, texture, and value of the featured rug. Don’t let anything else appear in the photo other than the rug (note the odd bits of seat and leg here). -
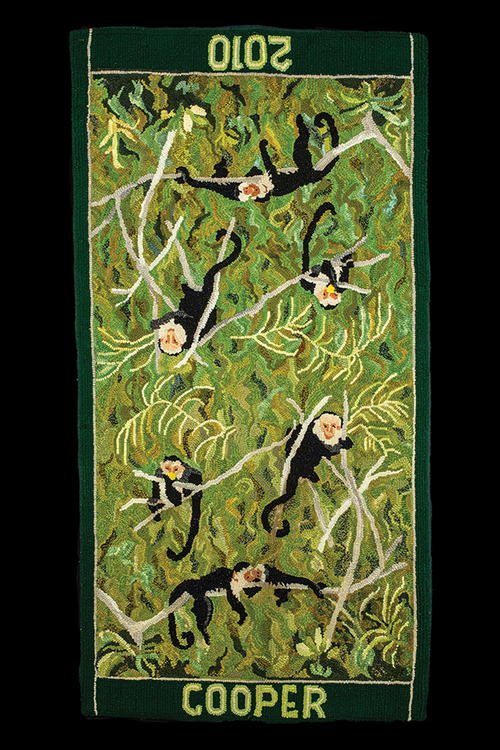
DO photograph a long, vertical rug with the camera oriented vertically (also known as portrait mode).
DON’T photograph a long, vertical rug with the camera oriented horizontally (also called landscape orientation). You want to fill the frame as much as possible with the rug, leaving a bit of space between the rug’s edges and the border of the photograph. DON’T try to correct this situation by cropping the photograph with software, because that severely diminishes the size and quality of the image required for print. -
DON’T leave so much of the photograph’s real estate empty of rug and full of backdrop. DON’T try to correct this situation by cropping out the background with software. DO fill the viewfinder or back screen as much as possible, leaving a bit of the backdrop showing on all four sides. Move closer to the rug to fill the frame. Make sure it is centered.
-
DO make sure the photo is properly exposed, as seen on the left.
DON'T underexpose it, making it too dark, as shown on the right. -
Top left: DON’T leave an edge curled under so the whipping is not visible on any part of the rug. Trouble with a curled edge like this can be solved with a bit of gaffer tape placed to hold down that curl during the few minutes it takes to complete the photograph. Don’t leave any strips of wool or yarn straggling, as you can see along the top edge of the rug. Top right: DON’T light your rug so there are areas of shadows leaking onto the frame, or anywhere on the face of the rug. To get rid of the shadows here, move the lamps further back away from or to the side of the rug until they disappear. Experiment with light positions, and take test shots to evaluate. Bottom left: DON’T leave hair or thread or lint on the rug. Groom the rug before you mount it to photograph. Bottom right: DON’T light the rug unevenly. Notice how the left side of the rug is much darker than the right. Also, notice how the light is bouncing off the black backdrop. For this rug, an off-white or neutral grey backdrop would have been a better choice so that the backdrop doesn’t compete with the background of the rug.
-
Top left: DON’T take a photo where the rug is keystoning (where one side appears wider or narrower than another when in fact, they are the same dimension). This happens when the face of the rug and the face of the camera lens are not parallel. Top right: DO try to line up the rug so it is straight. Lower left: DON’T use a backdrop that diminishes the impact of your rug. Lower right: DO photograph the rug against a backdrop that focuses all of the viewer’s attention on the rug. Remember that how you see color is informed by what surrounds that color. This applies to your rug hooking design, as well as to the backdrop you choose when photographing your rug.


What is Wrong with Your Photographs of Hooked Rugs?
Use this as a checklist the next time you photograph your rug or supplies and patterns.
-
o The rug is crooked in the photograph.
o The appears rug distorted and misshapen in the photo.
o The lighting is poor, with gray, shadowed corners, or “hot” spots of light. The photo overall is too dark or too light.
o The photo is out of focus.
o There is pet hair, human hair, lint, or threads showing on the rug.
o There is an edge or corner of the rug leaking off the edge of the photo.
o The full front view of the rug has the edges cropped out of the photo.
o The rug is not centered in the photo.
o The color looks nothing like your rug in real life.
o You shot a long, vertical rug with the camera held horizontally (also called landscape mode).
o You shot a horizontal rug with the camera held vertically (also called portrait mode).
o You did not fill the viewfinder of your camera with the image of the rug, leaving just a tad of an evenly spaced border; the rug takes up a very small portion of the area, and the rest is filled with background.
o Something other than the rug and appropriate backdrop can be seen in the photograph.
o Your background is interfering with how the rug looks because you shot it against something other than flat white, black, or neutral grey. Or the background is textured, wrinkled, patterned.
o You did not follow the detailed instructions for the photos required for your submission. We discuss that in the next installation.
About the Author:
Anne-Marie Littenberg is a Burlington, Vermont, rug hooker, photographer, and retired rug-hooking teacher. A frequent contributor to Rug Hooking magazine, she is the author of Hooked Rug Landscapes and Hooked Rug Portraits.

