
How to Photograph Your Rugs: Part 2
You can do this!
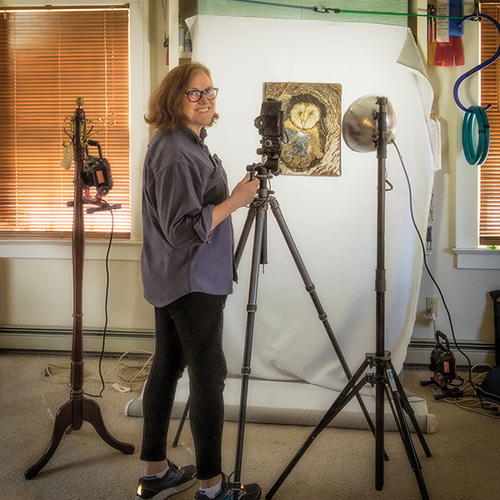
Anne-Marie at work. The rug portraying an owl (courtesy of Sandra Grant) has been pinned to foam insulation boards with t-pins. Note I pinned off-white fabric over the insulation to provide a neater background. You can see the roll of fabric on the floor in front of the mounting boards. This is a roll I got from the leftovers bin at my local upholstery store. It is flat off-white on one side, and a neutral grey on the other. There is no texture or pattern on either side of the fabric. The window shades are closed because I have a lot of natural light in my studio, and I don’t want the light on the rug to change as the outdoor light shifts and changes with weather and time of day. To my left is an old coat rack that I use to hang a lamp on (improvising gear from around the house is a thrifty and fun way to approach any project!). The lamp on the right is hanging from a “formal” light pole, but note the lamp is just a cheapie clip-on that costs a few dollars from the hardware store.
My camera is on a tripod and I am holding a cable release in my right hand to ensure that camera movement doesn’t blur the photograph. The camera is mounted in “portrait” orientation (vertical) because the rug is mounted in a vertical position. Finally, note I am in comfortable clothes and shoes. Setting up and photographing rugs involves the physical labor of hauling stuff around, so I make sure I am dressed for it!
Photography requires an artistic eye, a complex skill set, and the right tools. You know that it took patience, practice, and learning to master rug hooking—and it will require the same to learn how to photograph your work.
Here are some tips and tricks to dramatically improve your photographs. What I am about to share with you applies whether you are using a point-and-shoot camera, a fancy DSLR, a smart phone, or a tablet.
PHOTOGRAPHS CAN BE DECEPTIVE IN THE FOLLOWING WAYS:
1. The photograph that looked so great on the back of your camera screen doesn’t look anything like the image you have printed or are seeing on your computer screen. There are a number of reasons for this.
• A camera or phone screen, because it is so small, can obscure technical issues (like the photo being out of focus).
• Its small size can hide a stray hair laying across the hooked rug.
• The device’s screen shows a preview file created by the device specifically for viewing on that little screen; it is a separate, different file of data than what will be downloaded when you transfer the image to your computer. The
engineers have programmed the camera to make that preview look perfect. What you download is a different image, and it represents what your sensor captured.
2. Color, contrast, hue, saturation, and lens distortion vary from camera to camera, and computer screen to computer screen. For example, the default color palette of a Nikon camera has a distinct, different look from a device made by Canon or Fuji or Apple. Here is a fun exercise that demonstrates this. Have multiple people photograph the same scene with their individual cameras and cell phones. The scene could be a view from your yard, a bowl of fruit, or anything, including a hooked rug. Compare the results. No two photographs will look the same. (A professional photographer manages this issue by calibrating their computer monitors, and creating camera profiles specific to lighting conditions, ensuring the color captured is the color that printers and editors receive.)
3. Cameras are not as sophisticated as the human eye. Our eyes and brains correct how we see color and light better than even the most modern cameras in the world. This is why photos taken at the beach on a sunny day look grey or blue, nothing like the beautiful warm light we remember. This is also why that gorgeous scene of your grandchildren, with the sun setting behind them, photographs as a highly saturated sunset, with the children almost invisible in a dark silhouette. The photographer needs to know how to correct for the shortcomings of technology.
USE THE RIGHT BACKDROP
Take the pledge today! Never, ever again photograph your rug with your carpeting, floor tiles, barn slats, wrinkled or draped bed sheets, wooden flooring, or brickwork as the background. You took so much care with the color planning and design of your rug, and the same care needs to be taken to ensure your photographs don’t compromise that design. If you can see kitchen tiles or wood flooring around the edges of the rug, they read as part of the rug’s design. Do you remember when you were color planning, you were so careful about the placement of your wool, knowing that texture, color, saturation, and hue of one section can inform how the rest of the rug looks? The same thing applies to the background that displays your rug. Their lines interrupt the balance and composition. Color tones and value in a backdrop influence how we see color and value in the rug.
Have you ever seen a photograph of a rug in Celebration that has any of the materials mentioned above as the backdrop to the rug? I think not. Take that as a cue to make sure your rug photos do not either.
My preferred background colors are black, white, or neutral grey. I choose the final selection of one of the three based on the design and colors of the rug being photographed. I don’t want a pale-colored rug to get lost in a sea of white. I also don’t want the “whites” of a rug and a backdrop to compete. If the rug is predominantly mid-tone in values, I avoid a neutral grey background. In that case, my favorite choice is black because its contrast makes a mid-value rug pop. A dark rug with a black or very dark border looks great on a white backdrop; the dark border might be lost if photographed against a black backdrop. Experiment, and find the best option.
Follow the guidelines for publications and submissions Problems arise when a photographer, or candidate for a juried submission, fails to follow the guidelines provided by authors, publishers, printers, and graphic designers. Follow those steps precisely. If you find the instructions confusing, ask for clarification; double check to make sure you understand. The people who seek your photographs want to help you get them exactly right. It makes everyone’s work look better.
For example, submission to Celebration has detailed instructions for your rug photos, including a requirement for one full front view, two detailed (close-up) shots of the front, and one detailed (close-up) shot of the back (which should include a finished edge). However, if your full front view shot is zoomed in so that the entire finished edge is not visible, you haven’t provided a full view. “Full view” means absolutely nothing has been cropped out of the photo, including the edges. Celebration requests a detail (close-up) shot of a part of the finished back edge of the rug. If you submitted a photograph of the entire back, you did not follow the instructions.
GETTING TECHNICAL: THE DIGITAL DARKROOM
Digital cameras generally come with free software to help you with basic editing of your images. Other editing programs include products by Adobe (such as Photoshop and Lightroom), Luminar, Topaz, and several others. If your only interest in photography is getting your rug photos correct, then don’t worry about investing in other software; use the software that came with your camera or is part of your computer’s suite of products. You will have to experiment to decide what adjustments you want to make, but tread lightly and keep your edits limited to things like removing spots, straightening an image, and correcting exposure (making it a bit lighter if it is too dark, or a bit darker if it is too light).
Many people who first venture into the digital darkroom become enamored with functions that allow them to adjust saturation, sharpness, and clarity. Leave those functions alone. Please promise to never increase saturation with these features. What may look good to your eye on your uncalibrated computer monitor may actually be “breaking” the pixels, destroying the quality of the image.
Experiment with software, but be aware things can go wrong very quickly. Since you are shooting in jpg, the images have been developed for you by the engineers who created your camera. Think of it as analogous to when you took snapshots on film and took them somewhere to be developed. You left the developing to those who knew what they were doing. By shooting jpg, your camera is developing the image for you, and this is a good thing.
If you are working on images for social media on your cell phone and tablet, the devices come with excellent free editors. The best editor I have seen for this purpose is a program called Snapseed, available for free—consult Google. It allows you to edit on your devices, including spot removal. (This program is not available for computers, only for phones and tablets.) Free photo editing for your computer includes a program called GIMP. Google around and the Internet will provide other options.
HELP IS AVAILABLE
Remember to check the online sources of information for your camera and for photography techniques. If you try your hand at taking photos of your rugs and want an unvarnished review of the photograph (not the rug itself; just the quality of the photograph!), send me a copy via Facebook’s Messenger and I will be happy to provide advice. Or contact me with a low-resolution image via amwlittenberg [at] comcast [dot] net and I will try to help.
Image:
-
I spend a lot of time photographing rugs and other art for people (including paintings), and this is the gear I use.
Front row from left to right: a roll of gaffer tape, a carpenter’s level, measuring tape, and t-pins. The grey card under the t-pins is 50 percent neutral grey, and I use it to set a custom white balance. The little clamshell color palette (called the X-rite ColorChecker Passport) allows me to set a camera profile for each shooting sessions, helping ensure accurate color matching.
Middle row: a lint brush and a full-spectrum cfl bulb that I use in the inexpensive clip lamps I buy at the hardware store. The bulb is made by Longstar, FE-US-30W.
Rear row, left to right: Clip lamp, hand-held cordless vacuum, and my camera (with a 50mm lens that also does extreme close up work called macro) and shutter release, all mounted on a mini tripod. I usually use a full-sized tripod, but here it had been put to work in taking this photo, so I used the mini in the illustration.
Getting Help from Google and Youtube
Search the Internet for help in learning how to use your gear. These questions specifically address the camera settings I list in part 1, found in the last issue of RHM. They reappear here as a reminder that help is at your fingertips. Type these strings of words into the search bars of Google and YouTube, replacing where I have written the make and model of my camera (Canon 5D Mark III) with the make and model of your camera.
1) Set timer on the Canon 5D Mark III
2) Set level on Canon 5D Mark III
3) Set grid on Canon 5D Mark III
4) Set auto focus point to center Canon 5D Mark III
5) Turn off flash Canon 5D Mark III
6) Set Canon 5D Mark III to shoot jpg (or jpeg)
7) Set resolution to high Canon 5D Mark III
8) Set quality to fine Canon 5D Mark III
9) Set picture style Canon 5D Mark III
10) Set auto white balance (awb) Canon 5D Mark III
11) Set aperture priority (AV) Canon 5D Mark III
12) Set aperture to F/8 Canon 5D Mark III
13) Set metering mode Canon 5D Mark III
14) Exposure compensation Canon 5D Mark III
About the Author:
Anne-Marie Littenberg photographs hooked rugs from her home in Burlington, Vermont. She is also a retired rug-hooking teacher. A frequent contributor to Rug Hooking magazine, she is the author of Hooked Rug Landscapes and Hooked Rug Portraits.

