A Passion for Punch: Part Four
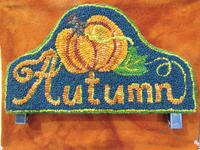
A Calendar Hanger for Autumn

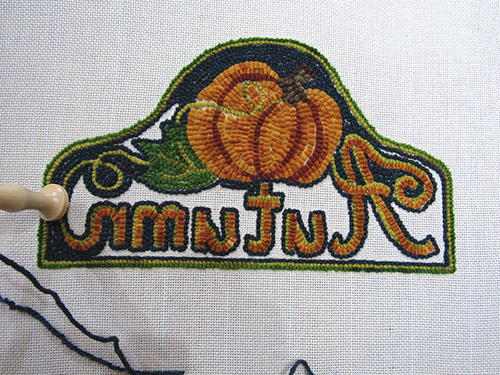
Punch a pumpkin for autumn!
Autumn is my favorite time of year. The frosty mornings and crisp sunny days, the glorious riot of color from the changing leaves, fresh apples, and the fabulous scent of warm spices or wood smoke in the air as we light the woodstove in the evenings to chase away the chill. With so many wonderful things about fall, I had a hard time choosing just one motif for this season’s design. I finally chose the pumpkin; the rounded shape is the perfect opportunity to showcase the technique of punching with both wool strips and wool yarn.
Combining wool strips and yarn in one piece is a great way to add interest and texture and, with practice, it is just as easy to punch wool strips as it is to hook with them.
We will use two different Oxford punch needles: a #10 Regular and a #13 or #14 Fine. If you don’t have multiple needles, please make the pattern using what you have: just adjust your materials accordingly.
Supplies and Tools
- Monk's cloth, or backing of choice
- Black permanent marker
- #10 Regular Oxford Punch Needle
- #14 or #13 Fine Oxford Punch Needle (either will do)
- 1/2 oz. yellow green
- 1/2 oz. leaf green
- A few arm lengths of light and dark brown chunky weight rug yarn
- Wool fabric cut in #6 cut strips. Amount noted is approximate.
- 1/16 yard light burnt orange
- 1/16 yard medium burnt orange
- 1/32 yard dark rusty orange
- 2 oz. Evergreen Yarn (a gorgeous blue-green) for background
- 1 standard sheet of plastic canvas to stabilize the project
- 13" x 15" piece of wool fabric in a complementary color
- wooden pants hanger with clips
- 8" of peel-and-stick hook-and-loop fastener (optional)
- Hot glue gun or needle and thread
Punching
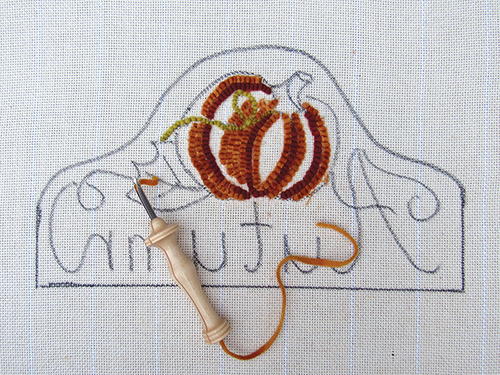
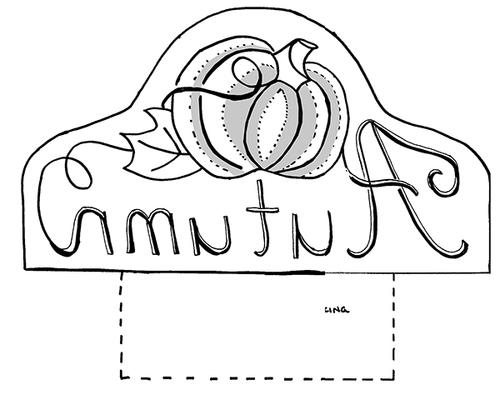
Transfer your pattern to your backing exactly as shown on the paper pattern without the dotted rectangle at the bottom. Stretch your backing tightly onto your frame.
Sometimes we need to create a holding line for small details while we punch the surrounding area so that we don’t accidentally fill the space with loops. Thread your Fine needle with some fine yarn and punch the curlicue vine that is overlapping the pumpkin to create a holding place. It doesn’t matter what color you use, as we will pull it out later and re-punch it, which will make the line crisp and clear.
Read the box on page 10, “Tips for punching with wool strips.” Thread your #10 Regular needle with the dark burnt orange strip and punch the inner curved lines of the pumpkin to form the indented ribs. Be sure to push your needle all the way into the backing until the wood handle stops it from going any further, and then only skim the surface with the needle tip as you pull your needle out to position the next stitch. Make smaller stitches than you normally would if you were using thick yarn. Wool strip loops don’t fill out as much as yarn loops will, so you’ll need more stitches in a running inch. If your strip runs out before you’ve finished the line you are working on, just re-thread and resume punching, starting in the same hole where the first strip ended.
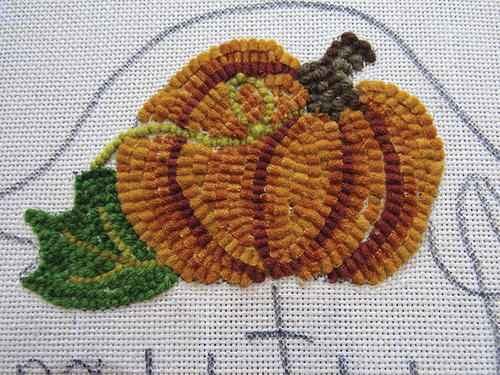
Next, thread the needle with medium burnt orange and punch the area marked MBO. Follow the curve of the pumpkin as you punch. The direction of your rows of punching enhance the shape of an object, and this is heightened even more when using wool strips. Now thread your needle with the light burnt orange and punch the final areas of your pumpkin, creating highlights on the curves and in the middle of the center rib. Don’t jump over the loops of the vine; instead stop, cut, and restart each time.
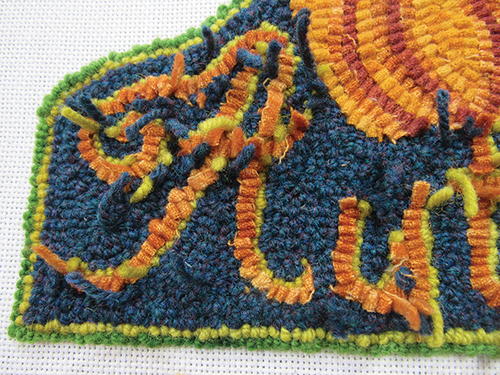
When you are finished with the pumpkin, turn it over and have a look. Chances are it will be untidy, but we will fix that up later. Check for any missing spots. We don’t want the rows crowded, but we don’t want backing showing, either.
Next, thread the same needle with the chunky weight brown yarns and punch the stem. One of my favorite things about teaching, other than meeting so many wonderful, happy punchers, are the fabulous things that my students teach me. It was from a student that I learned the stem of a pumpkin is called a peduncle. It is such a fun word to say and always makes me laugh when I work on any pumpkin projects!
When the pumpkin is finished, change to your Fine punch needle and using the yellow green, punch the veins in the leaf; use the leaf green for the main part of the leaf.
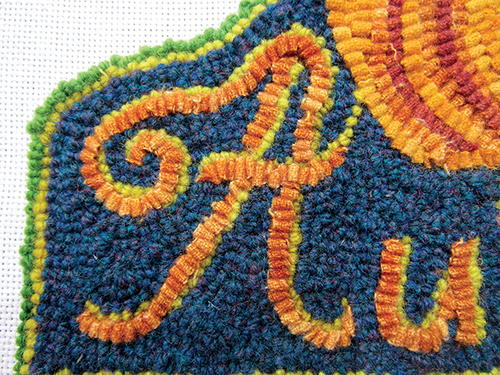
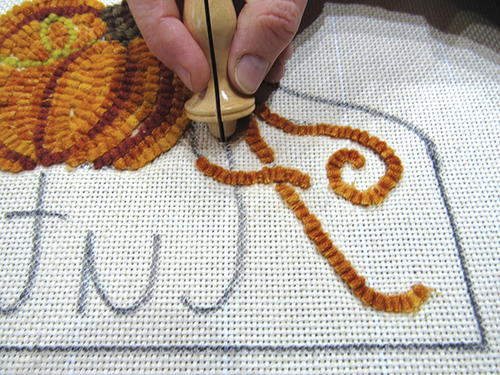
Now it is time for letters! I know many people are nervous about lettering, but the punch needle makes it so easy to do. Online calligraphy stroke charts can be a fun way to study the steps to letter formation, although it isn’t necessary. Using the #10 Regular and medium burnt orange strips, start on the letter A. Punch the first down stroke of the A, then punch the curved part, starting at the top and heading down. Remember to turn your needle as you travel so the loops form a nice arc over the top of the A and in the curly flourish. Punch the crossbar. Have a look at your letter on the other side. You may need to tweak a loop here and there. Don’t worry about making a mistake: you can always pull it out and try again, especially on monk’s cloth. Carry on punching the letters in this way, following their outlines.
When all the letters are done, change back to your Fine needle and the yellow-green. Punch the rest of the vines and the highlights on the letters to make them pop. Don’t overpack or crowd the orange letters.
Using the same needle and yarn color, outline the entire design to create a thin border, then repeat outside that line with the leaf green. Start the row on a straight bit instead of a corner. This will make your corners tidier.
Now you are ready to fill in the background. Using your background color, outline the letters, paying attention to the details and crannies. Don’t pack. Repeat with the pumpkin and the inside of the border. Fill in the rest of the background.
Pull out the holding line for the vine on the pumpkin that you put in at the beginning. Re-punch it using the yellow-green and the #10 Regular needle. When we use a thinner yarn in a Regular needle it sometimes slips a bit and the loops get a little taller than normal. In this case, this works to our benefit by making the vine stand out slightly above the pumpkin. If you have a #10 Fine you can use that instead, and your loops will be same height as the orange wool strips.
Your punching is now complete, and it is time to move on to the finishing!
-
Images:
-
Autumn Calendar, © 2019, Simone Vojvodin. For a punched piece measuring approximately 14" x 10", enlarge the pattern 200%. Note: check the size to be certain it will fit the hanger you plan to use.
Shaded portion = Medium Burnt Orange

Finishing
Take your design off the frame and turn it over. Clip all the tails level with the loops by gently pulling up on them where they emerge from the backing and snipping them off. Push any stray loops into their proper places. Check the wool strips, and straighten out any that are crooked. The tails sometimes sit funny, but they are easy to line up and trim off neatly. Occasionally some loops will be too tall, or too short, but this is easy to fix as well—by pulling up on short loops or neighboring loops to make things level. No need to be too finicky though, since steaming will also help to even things out. Using a very damp cloth, carefully steam both sides of the piece and allow to dry flat.
-
Images:
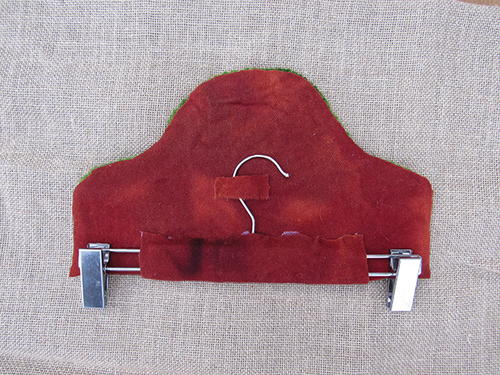
Assembling the Hanger
1. Gather together your original paper pattern and your other materials to finish your hanger.
2. Measure at least 1" out from your punching and mark this line all the way around with a permanent marker. Trim the excess backing at this line. Apply hot glue, or stitch around the piece to prevent fraying.
3. Turn the hem under so the backing cannot be seen at all from the front, then glue it down or baste with needle and thread.
4. Place the plastic canvas over the back of the rug and trace the shape approximately 1⁄2" smaller. Cut out the plastic canvas and secure it in place with a few stitches or dabs of hot glue.
5. Trace the punching pattern outline onto the wool fabric. Align the rectangle that is on the paper pattern at the bottom of the punching and trace this too onto the wool backing fabric. It is better to cut it out slightly larger than needed.
6. Secure the center of the wool fabric to the back of the piece—first using glue or by sewing. Then proceed by attaching the backing all the way around the edge, leaving the rectangle dangling from the bottom.
7. When the binding is secure, place the pants hanger over the back of the piece so the hanger bar aligns with the bottom edge. Fold the rectangle of wool up and over the hanger bar and secure it with a hook-and-loop fastener. Adding another little bit of fastener or a loop of wool near the top of the hook will prevent the hanger from tipping forward. Alternatively, glue the wool rectangle over the hanger and add a little tiny rectangle of wool over the hook.
Your Autumn Hanger is now complete. Hang your calendar, a wreath, some pretty fall leaves, or other seasonal decòr from it. These calendar hangars are so pretty to display!
-
Image:
Tips for Punching with Strips
• It helps to be familiar with punching with yarn before starting to punch with strips. Practice with the Regular punch needle and chunky weight yarn first. Then, when you are comfortable, play with the strips. You can practice in the margin of your pattern, since it is easy to pull out and start again.
• Cut wool strips as long as possible to avoid frequent re-threading or waste.
• Your stitch length will usually be different (smaller) with wool strips than with yarn.
• The direction that you hold your punch can make a big difference to how your loops will appear. Be sure to have the slot in the punch handle facing the direction you are travelling. Twisting the needle while travelling straight can lead to twisted loops. As you go around curves, make slightly tighter stitches, and turn the needle to follow the curve.
• Sometimes we want our loops to sit slightly twisted, to get into tight spots with wider strips or to create the look of a sharp point. To do this, turn you needle slightly as you make your stitch and it will plant the loop at a different angle.
• Avoid crowded rows. Resist the urge to pack one row too tightly against the neighboring one. Instead, move your needle over so the edge of needle is loosely against the edge of the previous hooking. The point will then be a few threads of backing over. This will allow the new strip to sit nicely beside the first one.
• Select wool fabric with a strong, tight weave. Washing and drying will tighten it up.
• Other materials also work well with the punch! Try strips of T-shirts, cotton, or velvet for interesting textures.
-
Image:
Punching with Wool Strips
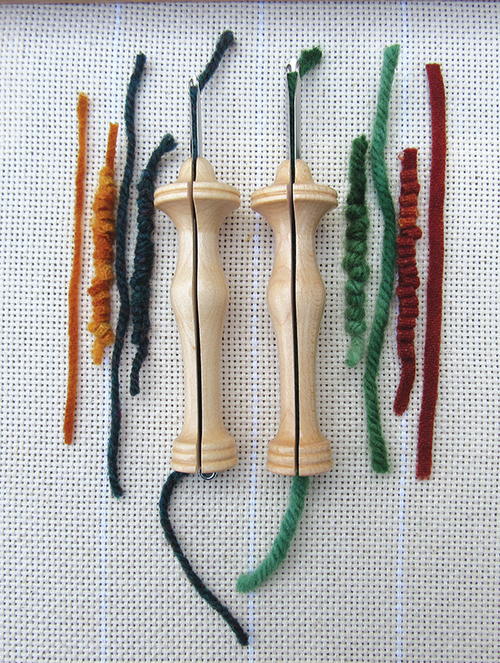
In “Passion for Punch: Summer” (RHM June/July/August 2019), we reviewed the different sizes of punch needles and how to use them; how they create different height loops; and discussed the two widths of punches. Let’s look at that a little more closely.
Oxford Punches come in two different widths: Regular and Fine. The Regular, pictured to the right has the wider needle and is perfect for chunky knitting yarns and heavy-weight rug yarns. It is also wonderful for punching with cut wool strips. You can’t tell the difference between a rug that has been punched with wool strips or one that has been traditionally hooked once it is finished. You can use strips from a #4 cut to a #8 cut, depending on the fullness of your wool fabric. My personal favorite is a #6 cut; I find it travels beautifully through the punch without getting caught or bunching up.
The Fine punch needle, pictured to the left, takes worsted weight yarns or finer. You can also use #3-cut strips, providing your wool fabric has a strong, tight weave. In my experience, using a shorter punch needle (#14 or #13) for the fine strips prevents the loops from getting tangled together.
-
Image:
About the Author:
Simone Vojvodin is a passionate Oxford punch needle teacher and award-winning artist. Her work has been featured in art galleries, shows, and Celebration multiple times. You can purchase patterns, kits and punch needle supplies from her studio: Red Maple Ruggery, www.redmapleruggery.ca.