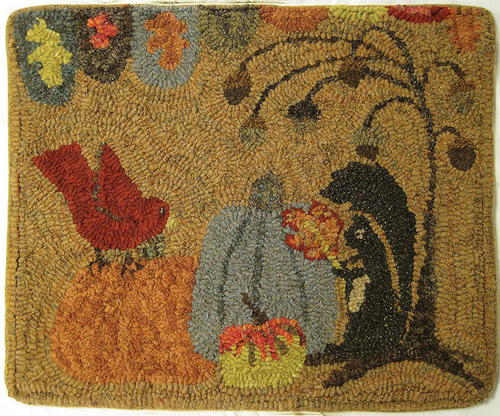
Autumn Friends
A Rug Hooking Exclusive Pattern

Autumn Friends, 20" x 17", #8 and 1/8"-cut wool on primitive linen. Designed and hooked by Cathy Tokheim/Old Friends Woolens, Swea City, Iowa, 2013.
Autumn in northern Iowa is usually a long, mild season, and I enjoy the change of season as the greens of summer turn golden hued and tawny, sprinkled with shots of red, salmon, and orange. We have squirrels aplenty on our farm, mostly the lovely gray/gold variety. Once in a while, I see a black squirrel, and they are spectacular.
Autumn Friends is a collection of some of my favorite things about autumn. The colors of the season are so varied, making the rug a joy to hook. I discovered some great combinations of textures as I hooked this mat, so I suggest using mostly textured wool to give the rug a scrappy look.
I hand cut my wool, and the strips are close to #8 in width, but in some areas of the pattern, I cut my ¼" strip in half to get the detail or fill a space. The squirrel’s eye and ear were a little tricky; it is difficult to get the detail and not hook it out of proportion.
If you use a cutter, try the #6 and #8 blades for your strips. Be sure to machine stitch two rows of stay-stitching around the pattern before you hook a loop.
If you plan a wool-covered corded edge, apply it before you hook. I used the wool corded edge that my friend, Jean Bartel, uses, and it worked wonderfully. She advises to cut or tear a strip of wool 2 ¼" wide and fold it around a ¼" diameter length of cording, 6" longer than the outside edge length of your pattern. If you have to piece the strips, sew them together with a small ¼" hem. Do not match up the long raw edges of your wool strip, but have them about ¼" to ½" from each other, making a step down layering of the wool. This will prevent the wool that will be turned to the back side of your rug from being too thick and bulky, since you will also have the raw edge of the foundation under the wool edging.
Using a zipper foot on your sewing machine, sew the cording into the folded wool, making a welt casing for the edging of the mat. Then, still using a zipper foot, position the welt over the black outer line of the pattern, with the widest side of the wool fold on the upper side and the corded welt next to the pattern area. You want the corded welt stitched as close to the outer black line of your pattern as possible. It’s a little tight as you go around the corners, but if you stop with the sewing machine needle in the fabric just at the point of the corner, lift the presser foot, and turn the fabric to the next side of the pattern, then lower your presser foot and resume sewing, you should have a pretty good corner. When you get back to your starting point, make sure you don’t double up on the welt, which will make a lump on your edge. Line up the cording on both ends so that the cording will butt ends, and trim off the excess. Make sure some of the wool casing is freed up so you can cover the start of the cord with the end of the wool casing. The short raw end of the wool casing will need a small fold under to give it a finished edge. Sew the corded welt all the way down.
I use a corded edge on my mat for stability and durability or when I whip the edges with wool yarn, but you can finish your mat how you wish. We can finish our mats in many good ways, so choose the method that works best for you.
Vacuum or lint roller your mat to remove any stray threads and lint, and trim any fuzzy threads that pop up from the nap. Block the mat with your steam iron, and let it dry. Trim off the excess foundation so that the raw edge will be covered by the hem of the corded welt when you turn it to the back side of your mat. Turn the wool hem to the back side. You may need to clip the corners of your foundation and miter the wool hem so that it will lie flat. Hand stitch it to the foundation with a sturdy thread, like button thread.
I used a higgledy-piggledy method of hooking on the orange pumpkin to indicate warty skin. If you haven’t tried this method, you should. It gives a great texture! The tall pumpkin’s color comes from the heirloom variety called Jarrahdale or Blue Hubbard. Try the higgledy-piggledy method on the blue/green pumpkin as well. I love that blue/gray/green color against the warm colors of golden leaves and grasses. For a more primitive look, outline the motifs with contrasting wool. This is a fun, whimisical way to add contrast.
The rest of the mat goes together pretty easily, without a lot of fine detail. There are a lot of great textured wools available, so the color plan for this mat could go a lot of different ways. With so many colors of autumn, pick colors to suit your tastes.
Cathy Tokheim is the owner of Old Friends Woolens. She teaches, designs her primitive rug patterns from everyday inspirations, and plays with wool to find new color palettes for her students. Visit her shop on Etsy atwww.etsy.com/shop/oldfriendswoolens.
This article is from the September/October 2013 issue. To get this exclusive pattern or for more information on our issue, check out our issues page.
Note: For this article, 1/16 yard or 1/32 yard refers to taking a fat quarter of a yard of wool and dividing it into fourths (1/16 yd.) or eighths (1/32 yd.). There are many wools used in this piece, but not very much of any one wool, except for the background.
Read NextElaine


