Hot Cocoa and Snow
A Rug Hooking Exclusive Pattern: This delightful winter themed pattern combines two of Wendy Miller's favorite things: snow and winter.
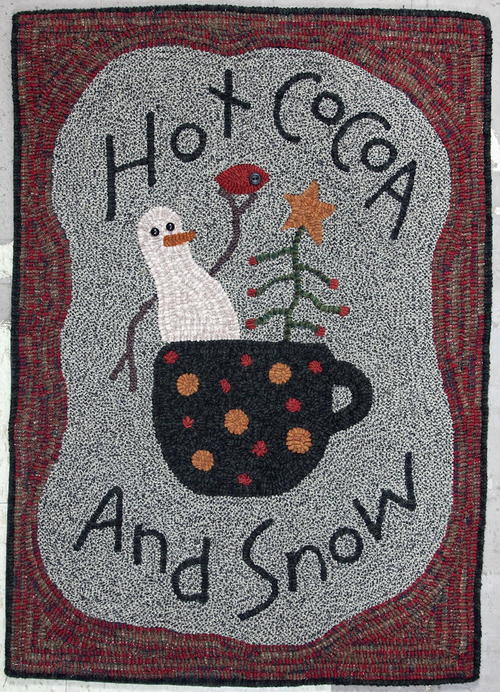
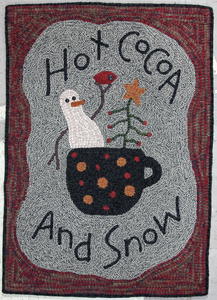
Hot Cocoa and Snow, 22" x 31", #8 1/2-cut wool on primitive linen. Designed and hooked by Wendy Barton-Miller, Attica, Indiana, 2010.
Growing up in rural Indiana, I have always loved snow and winter. I wait patiently every winter for the first snow and celebrate when it arrives, and I am sad when the weather turns warm, and we head into spring. I enjoy nothing more than a snowy day, a hot cup of cocoa, a hook in my hand, and a good winter pattern to hook. That is how Hot Cocoa and Snow came to be.
I hooked this version of Hot Cocoa and Snow in my favorite black/natural honeycomb background wool. When hooked, that wool reminds me of snow and it provides the perfect primitive background for this rug. I planned to display this rug for the entire winter season, so I kept the holiday colors muted and subtle.
Transferring the Pattern
Take the paper pattern insert to a copy center and enlarge the pattern to a finished size of 22" x 31". Tape the enlarged paper pattern to a glass patio or coffee table and lay your linen rug foundation on top. Place a small lamp underneath the table to provide light up through the glass, the paper pattern, and the linen. Position your linen square with the pattern. Using a permanent marker, draw the outside lines of the rug first, making sure to follow one thread and draw the straight outer lines on grain. After you have drawn the outer lines of the rug, trace the wavy inner border line, cup with polka dots, snowman, tree with star, bird, and words.
Hooking the Pattern
Cup
Hook the polka dots of the cup first. Use mustard texture for the larger polka dots and red for the smaller polka dots. Hook the outside row of each polka dot circle first, making sure you are hooking inside the lines of each circle. Then fill in each polka dot with the appropriate color: mustard or red. Hook the outline of the cup and each polka dot with one row of antique black. Remember to hook inside the lines of the cup, so the cup stays the correct size. After all outer lines of the cup and polka dots have been hooked, continue to hook more rows around each polka dot and more rows that echo the inner shape of the cup until the entire cup area is filled in with antique black.
Snowman
Hook his carrot nose in the pumpkin/rust texture. Hook the snowman in light textured wool. Outline the snowman first with one row, then fill him in with more echo rows of light texture until the entire body is filled. Using the brown tweed, hook a single row of loops for his twig arms.
Bird
Outline the bird with one row of red (inside the lines), then fill him in with more rows that echo the shape of his body. If you're going to use an old button for his eye, ignore the marking for the button and fill the entire bird in with loops of your red wool. Buttons will be hand sewn on at the very end, on top of your hooked loop pile, with strong nylon carpet thread.
Tree and star
Using the green textured wool, hook the trunk and branches of the tree in a single row of hooking. On the very tip of each branch, I hooked a couple loops of red wool. This small amount of red accents each individual branch nicely. If you love old buttons sewn onto your rugs, you may want to sew some old red buttons at the end of each branch once your rug is hooked.
Words
Hook the words "Hot Cocoa and Snow" with one row of antique black wool. Do not let letters intimidate you! I always tell my beginners to think of them as lines, not letters. Hook your lines, and when you're done, they'll be letters.
Background
Using the black/natural honeycomb textured wool, hook one row around each object, as well as each of the letters, to lock their shapes in place. Hook one row inside the wavy border to form a holding line for your background. Now continue to hook rows around all subjects and letters, hooking more rows inside the wavy border as well, until the entire background is filled.
Border
Outline the black/natural honeycomb background with one row of olive/red plaid wool. Then hook the rectangular outer edge of the border in the olive/red plaid wool. Continue filling in the border area with the olive/red plaid wool. Using antique black, hook one row around the outer rectangular shape of the rug to frame it nicely.
Finishing the Rug
Press your rug with lots of steam, using a cotton towel between the iron and your finished rug. Press the back of your rug, then turn it over and press the front of your rug. Repeat, if necessary. If your rug has lost its shape during the hooking process, now is the time to use lots of steam and tug it into a nice shape again. Lay the rug on a flat surface and let it dry overnight.
Bind the rug with the technique of your choice. I bound this rug using antique black cotton rug tape. I serged off the excess foundation, sewed rug tape very close to the last row of hooking, then folded it over to the back side of the rug and hemmed down over the rug backing's raw/serged edge to hide it. I mitered and sewed the corners of the rug tape down neatly. Whatever binding method you chose, be sure to press your rug edges again, if necessary, after binding.
Button Embellishment
If you've decided to use buttons, now is the time to add them. Using a sharp needle and carpet/upholstery thread, sew your own old black buttons from your collection for the bird's eye on top of your hooked loop pile, and old shoe buttons (or black glass beads) for the snowman's eyes. Sew old red buttons on the tip of each tree branch on top of the hooked loops.
Wendy Barton-Miller is a frequent contributor to Rug Hooking magazine. She travels and teaches wide cut primitives and can be contacted through The Red Saltbox, 503 South Brady Street, Attica, Indiana 47918, (765) 762-6292. Visit her website at www.theredsaltbox.com. Pattern transfer for one-time personal use only, not to be copied or resold.
This article is from the November/December 2010 issue. To get this exclusive pattern or for more information on our issue, check out our issues page.
Read NextHere Comes Santa