A Passion for Punch: Part Two
A Calendar Hanger for Spring: Part Two of a Series
It’s time to change your punched calendar to Spring! Calendar header #2. See the Winter header in the January/February 2019 issue.
Is there anything more gloriously welcome than the first sweet days of spring? After the winter my eyes are starved for color and light, and never is there a more welcome green than that of the vibrant first buds on the trees and the brightening of the grass. Even on chilly days I venture to the bench outside my studio door to punch with the sounds and smells of spring all around, the warmth of the sun on my face. It does my heart good.
After the snow drops and crocuses make their daring appearance, the next flowers to venture forth are the tulips and daffodils that line the path to my studio. One tulip has a breathtaking combination of reds, violets, and golden yellows and I knew I had to share it with you in this spring piece.
Punching your Design
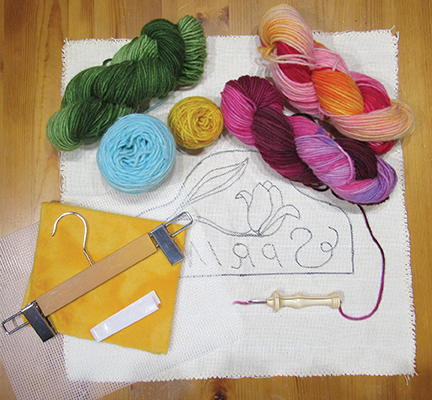
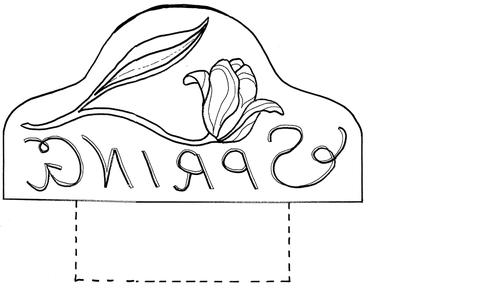
Trace the design onto your monk’s cloth or other backing of choice. Since punch needle is done from the back, the words need to be in mirror image on our pattern just like the paper copy shows. Stretch the backing tightly onto your frame; take care to stretch it evenly so you don’t distort your pattern. If you are new to punching or still gaining confidence, refer back to the “Punching Best Practices” in the first article of this series in the January/February issue of RHM.
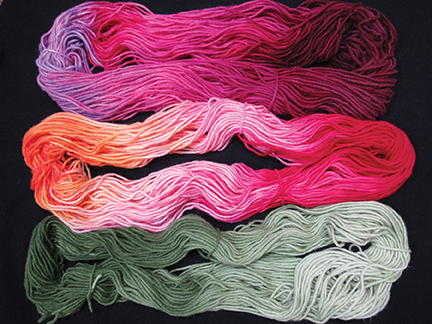
Punch your border color first. I used the orange/yellow/pink/red violet/bright red skein. Thread your punch and choose a place to start; avoid starting in the corner because those two little tails become really obvious when the rug is finished. Punch all the way around and then make a second row inside the first and fairly tight against it. Watch how the color changes: Notice the subtle shifts and how long it takes for one color to switch to another. Is the change abrupt or does it flow gently into the next? How many inches does one hue or value cover before it changes? You’ll use these observations when you punch your tulip.
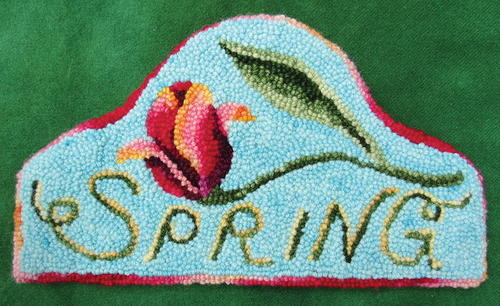
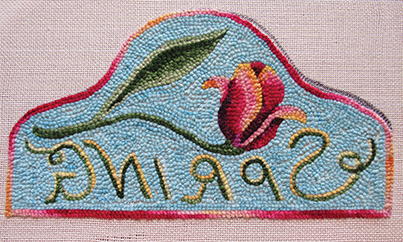
Planning to punch the tulip. Study the picture of the finished tulip. Notice that the petals are layered, each wrapping around the center, with some petals more open than others. The lower areas of the petals are shades of red and maroon which transition to pinks and into yellow-y oranges at the edges. The parts of the tulip that are in the shade because of their shape or placement are darker; those that are exposed to the light are lighter. The very center portion at the top is still showing just red maroon since it has not begun to unfurl. This big range in hue and value really adds interest and depth to the flower. Notice how the rows of punching follow the contours of the petals, following the gentle curving form, creating the illusion of depth and form.
Punching the tulip. Using the same yarn that you used for the border, pull the yarn through the punch until you reach the brightest orange/yellow part. Punch the outer edges of the tulip petals that are marked with the L/OY symbol. Remember: when you stop and start you want all your tails to be on the finished side of your rug.
Next, pull your yarn through the punch until it becomes peachy/pink and punch that in the areas marked L/PP. You’ve now created the light tips of the tulip petals. Take a moment to check your stitches: are they the proper size and are your rows nicely spaced? Remember you want it to look filled in on the front side but not too packed. If all is well you can punch the reds! Pull your yarn through until you have the red violet starting to show. Punch a little red violet next to the peachy/pink and then a little bright red next to that in the area marked M/RVR. Can you see your petals taking shape? Finally, it is time for those delicious deep darks! I needed to change to the other skein of variegated yarns to get these. Find the light maroon color that is just a few values deeper than the red and start with those, then end with the darkest maroon color where the shadows are the strongest in the D/MDM. At the base of the front petal, add the dark violet.
Take a good look at your flower. Can you see the transitions and the illusion of dimension?
Punching the leaf. Tulip leaves are long, elegantly simple affairs. Notice that the leaf has a light upper edge where the light catches it and a drastically darker part immediately below where the leaf is shadowed by the curling upper edge. This dark area appears tapered on either end and slightly wider in the center. The green transitions gradually to a lighter value on the lower part of the leaf, with the lightest green just along the bottom edge where the light catches it.
Punching the stem. To punch the stem, choose the darkest part of your spring green yarn and punch where the stem meets the flower. Then carry on down the lower part of the stem, punching to the tip. If the yarn starts to get too light, selectively cut to return to the darker green. When you reach the tip, turn and come back, allowing the yarn to change to the medium green as you go along. Now, select the very darkest part of your spring green yarn and punch the darkest section of the leaf where it is marked D/SG. When that is complete, use the medium green to fill in the area below, marked M/SG. Keep on punching, filling in the lower section with the light green and the very lightest bit right along the lower edge. Try to create a gentle shift from the dark to the light in the center of the leaf. The change is much more dramatic where the leaf joins the stem as the leaf curls more tightly at this spot. Punch the very upper edge of the leaf next with the light green allowing it to slowly change to medium green as you approach the stem. Punch one final row of loops along the upper edge of the stem towards the tip to smoothly join your leaf to it.
Punching the Word
Punching SPRING. Make your loops tight enough that they are touching each other with no gaps at all, but not so tight that they are shoving each other out of the way. Choose your darkest bit of green and start at the tail of the S. It is best not to jump over where the curlicue crosses, so stop and cut and resume punching after the crossover. Continue with the other letters until they are all punched.
Adding highlights. Select your lightest or brightest yellowy-orange for the highlights of each letter. The letters may look illegible at this stage, but will improve when the background goes in around them.
Background
Bright turquoise blue looks fresh and pretty next to the other colors. Punch around the inside line of the border and shapes, then fill in being careful not to crowd too close to the motifs or lettering. Crowding might distort the shapes. Be certain to get into the nooks and crannies with just a loop or two. Your piece should now look like the photo above.
Trim all those tails and any loops that are too tall by gently pulling up and snipping them level. Look closely and make sure you are snipping them where they are supposed to emerge from the rug as sometimes tails and loops will wander away from their original destination, making the image blurry and untidy. If this happens gently pull and poke the yarn back to where it is supposed to be. Give the rug a steam on both sides and allow it to dry.
Assembling the Hanger
Mark the backing 1" out from your punching and then trim off the excess. You may want to put hot glue or Fray Check around the cut edge of the hem, or stitch around the edge, so that it doesn’t unravel as you do your finishing. Turn the hem under so that it lays flat against the back of the rug and can’t be seen from the front. Press the hem in place and either glue it down or baste it with a needle and thread.
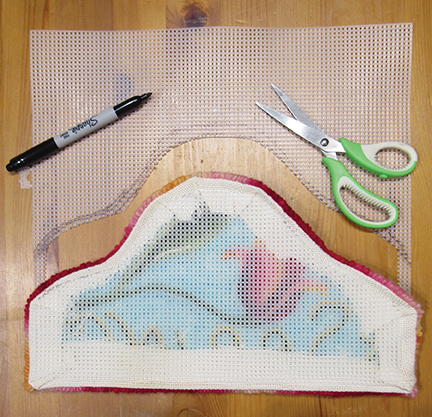
Place your plastic canvas over the back of the rug and trace the shape onto the plastic, staying about 1⁄2" to the
inside. Cut out the plastic canvas and double check the fit. You should see a nice 1⁄2" border all the way around it.
Fasten it in place with a few dabs of hot glue or a few stitches with a needle and thread.
Next, lay your rug onto your wool fabric, placing the punched arch at the top edge. Lightly trace the outline of it onto the wool, including the dotted rectangle shape that is on the paper pattern. You should now have the calendar shape and a little rectangle extending from the bottom drawn onto your wool fabric.
Cut it out and fasten it to the back of the rug by placing a few stitches or a few dabs of glue to the center part.
Continue to attach the two pieces by stitching neatly all the way around or with hot glue. Place your punching face down and lay the pant hanger on the back. Affix the sticky hook-and-loop fastener along the bottom edge of the rectangle; then fold it up over the hanger so that the hanger bar will be encased in the wool. Affix the other half and put the fastener together over the hanger. If the rug tips forward when you hang it up, add another little piece of fastener or yarn near the top of the hook to help hold it in place.
Your SPRING hanger is now ready to use. Hang your calendar from it, or Easter decorations!
Stay tuned for the next installment when we get ready to enjoy the hot, hazy days of SUMMER!
Materials:
-
Monk’s cloth, or other backing of choice
• Black permanent marker for tracing
• The paper pattern
• #14FINE (the Mini) or #13FINE (the Mini with Heels) Oxford punch needle
• Yarn: worsted-weight or Aran-weight knitting yarn or finer. Amount required is approximate. These colors are a recommendation; feel free to choose whatever colors you love.
• ½ oz. variegated yarn: orange to yellow to light pink to red violet to bright red
• ½ oz. variegated yarn: light maroon to medium maroon to dark maroon to soft violet
• ½ oz. variegated yarn: light to medium to dark values of mossy spring green
• 3 oz. turquoise blue
• 1 standard sheet of plastic canvas to stabilize the project
• 13” x 15” piece of wool fabric in a complementary color
• wooden pant hanger with clips
• 8” of peel-and-stick hook-and-loop fastener
• A hot glue gun or needle and thread
A Bit About Backings
-
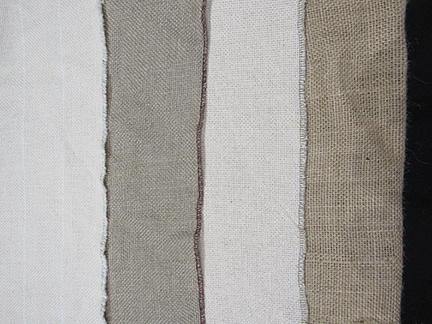
• These are the possible backings for punch, shown here from top to bottom:
• Monk’s cloth is the superstar of the punching world and is preferred by many punchers. It has all the qualities we want in a good punch backing: it is strong, durable, forgiving, and stretchy with a nice even weave. The stretchiness allows it to grip the loops perfectly. A good monk’s cloth has two strong cotton strands for every thread of warp and weft. Not all monk’s cloths are made the same, and not all are suitable for punching. Some are much too loose, others are poorly made and the threads break as you punch. It is worth seeking out good quality monk’s cloth
• Linen is also an option. It isn’t stretchy like monk’s cloth so occasionally there are struggles with loops not staying in, especially if you are using a fine yarn. It comes in different thread counts: primitive linen is an open weave; traditional linen is woven tighter. If you use linen, make sure your yarn is thick enough to grab in the backing properly. Like quality monk’s cloth, it is very strong and durable, but it is more expensive.
• Rug warp is a strong cotton backing. It has an even weave with a thick single strand thread. It is slightly stretchy, inexpensive, and similar to monk’s cloth. It is a light color, which makes your design easy to see.
• Burlap is not recommended. It has a loose uneven weave that makes it challenging to work on, and its lack of strength and durability leave many disappointed.
Tricks of Punching and Shading with Variegated Yarn
-
Variegated yarns are an easy way to add pizzazz to a rug! Notice how the colors change in these yarns.
• Trick #1: Sometimes I’ll use the changing colors just as they appear off the skein, especially for borders or filling in backgrounds. Other times, I’ll use certain variegated yarns to shade—if the yarn has gentle hue or value transitions the shading will flow smoothly.
• Trick #2: Fussy cutting. I use a method of “selective cutting” or “fussy cutting.” I pull the yarn through my needle until I see the color that I want to use. I cut off the first unwanted bit of yarn and set it aside to use later. Now I am set to punch and will fill in the area with the color I want. If the color changes to another shade too soon, I stop, pull back a loop or two, cut the yarn, then repeat the first steps until I’m back to the color/value that I need. The color might change perfectly while I fill in the entire area or I might need to stop, cut, pull, and punch a bunch of times.
• Trick #3: Save those bits. Eventually the design will call for the color I initially discarded. That’s when I start to use those cut-off bits, as called for by the design. Hardly anything goes to waste.
Additional Images:
-
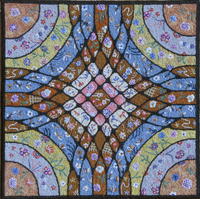
This is the active side of the punching project. In punch hooking, the loops are on the back side.
-
KEY
L/SG Light spring green
D/SG Dark spring green
M/SG Medium spring green
L/OY Light orange yellow
L/PP Light peachy pink
M/RVR Medium red violet
D/MDM Dark medium maroon
Spring Calendar, © 2018, Simone Vojvodin. For a hooked piece measuring
approximately 14" x 10", enlarge the pattern 200%. Note: check the size
to be certain it will fit the hanger you plan to use.
About the Author:
Simone Vojvodin is a passionate Oxford punch needle teacher and award-winning artist. Her work has been featured in art galleries, shows, and Celebration of Hand Hooked Rugs. You can purchase patterns, kits, and punch needle supplies from her studio: Red Maple Ruggery. www.redmapleruggery.ca.