A Passion for Punch: Part Three
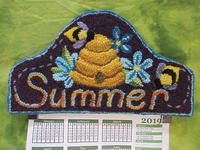
A Calendar Hanger for Summer

Oh, how sweet these summer days are, filled with some of my favorite things like flowers and sunshine, camping and gardening, iced tea and bare feet!
I wander in the garden listening to the pollinators busy at work; the expression “busy as bee” is certainly accurate! Those little fellows never seem to stop. Their gentle droning as they go about their work acts as a lullaby, increasing the lazy moods that come on hot, hazy days. The honey bees are single-mindedly determined, and the chubby, fuzzy bumblebees make me smile as they bumble about in their endearing clumsy manner.
These buzzing friends perfectly represent summer, and what better way to depict them than to replicate their round velvety bodies and the curves of an old-fashioned hive with two different sculpting techniques.
Oxford punch needles come in eight different sizes and we are going to explore the use of the five Fine punch needles to create the extra depth and dimension. If you don’t want to sculpt, or only have one needle, please don’t fret! The design will look great simply punched.
Preparation
-
Gather your materials.
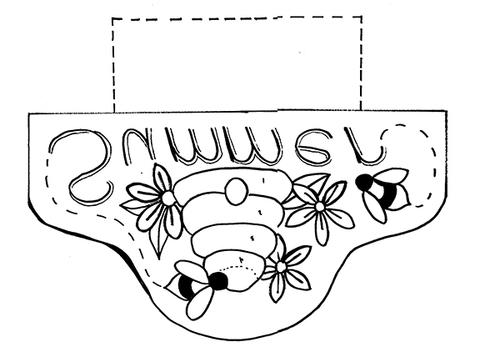
Transfer the pattern to backing, ignoring the dotted rectangle at the bottom of the design, and then stretch it tight on your frame. As we learned in the first parts of this series, the design is in mirror image since punching is done from the back.
Punching the Beehive
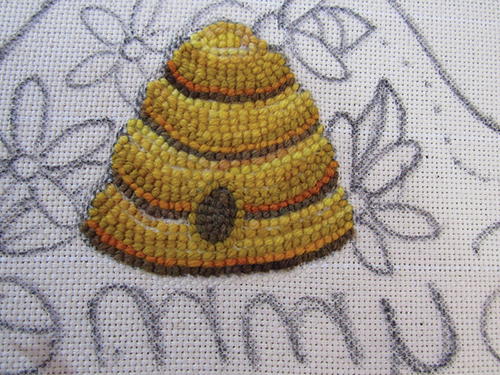
The beehive is the perfect place to start the sculpting adventure! We are going to easily create a 3-dimensional effect by using different size punch needles. (Remember, if you don’t have different punches, that is okay! Just go ahead and punch the entire design with the needle that you do have. Your hanger will still look lovely.)
Start with the #13 Fine punch needle and, using the brown yarn, fill in the oval of the beehive entrance, staying to the inside of the line and working your way round until complete. Then punch the lower lines that differentiate each of the numbered segments of the hive, including the very bottom of the hive. Keep your stitches fairly close and even, and leave room for a line of stitches to go around the oval that you punched. You should now have four lines of brown.
Change to the golden orange yarn and punch a line above each of the brown lines, still with the #13 punch. Punch the outline of the beehive entrance with the dark golden yellow.
Now it is time to switch needles. Thread the #10 Fine with the dark golden yellow and punch a line above the orange lines. Don’t crowd the rows or the sculptural effect will get messy and unclear. Change yarn to the light golden yellow, and fill in the dotted segment at the top of section 4, plus add a line at the top of sections 1, 2, 3. Thread the #9 with medium golden yellow and punch a line above the dark golden yellow, and a line below the light golden yellow for a total of two lines added to each section. Finally, switch to the #8 Punch with the medium golden yellow and fill in the remaining spaces.
Turn your piece over, trim the tails level to the loops, and have a look. It should look as though that hive is coming up off the backing! If there are some loops that have shifted, just tidy them up by poking them back into place. Don’t worry if the outer edge of the hive looks messy—this is normal and will improve once the background is punched.
-
Images
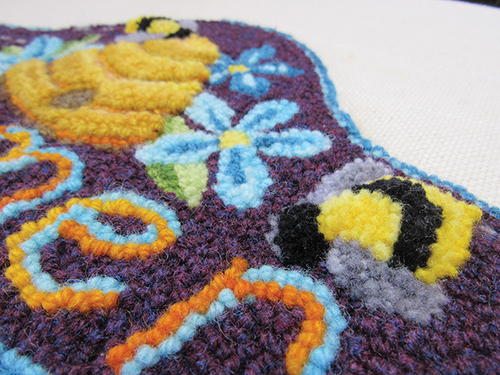
Punching the Bees and Flowers
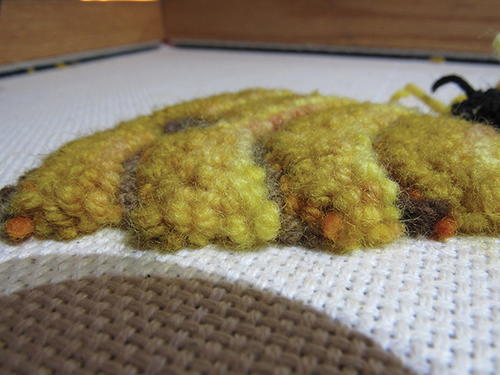
We are going to do a clipped sculpting technique to help them look like fuzzy bumblebees. Clipped sculpting means that we can punch the entire bee with just one tall punch needle—the #8 Fine. Stay to the inside of the shape as you punch or the bees will turn into balloons! Thread the #8 needle with the gray and punch the wings and the outline of the head. Switch to the black yarn and punch the head and the band on the body. Finally, punch the rest of the bee with bright bee yellow. The other side will probably look like a giant mess; have no fear--that is normal and we will fix it up and finish the sculpting after the other colors are in place.
Now the bees need some flowers! Using the #13 Fine and bee-yellow yarn, punch the flower centers. Then with the dark teal, punch the veins on the two lower flowers. Change to light turquoise and punch the petals, once again staying to the inside of the lines. Punch the veins on the upper flower, then change back to the dark teal and complete the petals of the final flower. Continue using the #13 to punch the leaves with two tones of green.
With the golden orange, punch the letters of Summer. Add the highlights with the light turquoise, and punch the gray dotted lines that show the flight path of the bumblebees.
Punch the Background
I wanted a warm, rich color to represent the heat of summer. Deep mulberry plays beautifully off the yellows, golds, and teal. When we punched the motifs, we used punch needles ranging from a #13 to a #8 Fine. Now we will make use of the shortest punch needle of all, the #14 Fine. The resulting shorter loops will make the letters and flowers stand out and emphasize the sculptural look of the hive and bees. When you punch the background, be careful not to crowd the rows. The loops should fill in on the finished side, but we should still see little bits of backing peeking through on the side we are punching from.
Clean Up the Punching
Take your design off the frame and turn it over. It will look a mess and that is okay! Clip all the tails by gently pulling up on them and snipping them off level with the neighboring loops where they emerge from the backing. Straighten out the loops of the lettering, ensuring they are nice and crisp.
Sculpting
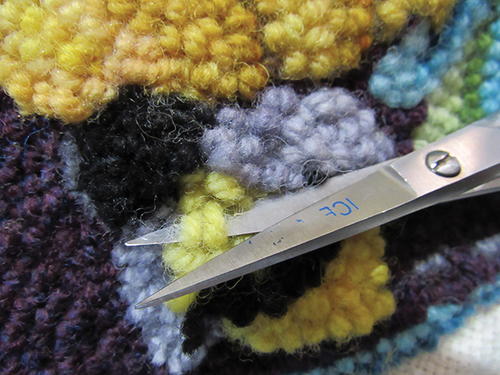
Now it is time to tackle the sculpting of the bees. Insert the tip of your scissors into each loop and gently pull upward as you snip, cutting each loop in half. You may have loops that poke through other loops and tails that meander far away from where they should be. This is a common occurrence when using longer punches, as the long loops catch other loops as you work. The good news is this is quick and easy to fix; gently pull, poke, and prod these runaways back into their proper spots. You should have distinct areas of colors.
To sculpt, start at the head. Clip the gray outline yarns to the same height as the mulberry background loops and do the same with the wings. Next clip the first row of black yarn on the head just a teensy bit taller than the gray. Angle your scissors slightly so the inward half of the yarn gets cut slightly higher than the outer. Slowly keep trimming the other loops of the bee’s head, getting increasing longer as you move inward to form a smooth dome shape. Take a little off at a time. You can always trim away more, but you can’t add it back! Don’t be afraid though; if you do make a mistake and cut off too much, it is easy to pull out the yarn and re-punch it if necessary. Proceed to the bodies, trimming the edge yarns to the same height as the background and then building upward to create another gentle dome. You may have fuzz and clippings everywhere; a good shake will clean it off nicely. Occasionally I’ll get out the little hand vacuum and carefully suck up the fuzz. A sweater de-fuzzer works well too!
-
Image
Assembling the Hanger
Gather the materials to finish your hanger, including the original paper pattern. If your rug is curling profusely, carefully lay a damp cloth over it and steam only the areas punched with the #14 and #13. Do not steam the high sculpting or the loops will crush and the sculptural effect will be lost.
After the piece has cooled, measure one inch out from your punching and mark the backing all the way around with a permanent marker. This is the trim line where you trim off the excess. Seal the edges with fray check, hot glue, or stitching, and then cut along the line. Turn the hem under so the backing cannot be seen at all from the front. The outer row of punching should lie flat on the table. Glue or baste the hem in place with needle and thread.
Place the plastic canvas over the back of the punching and trace the shape approximately ½ inch smaller than the punching, all the way around. Cut it out, and after double checking the fit, secure it in place with a few stitches or a dollop of hot glue. Now, place your punched piece on the wool fabric, leaving room at the bottom for the rectangle that protrudes from the design on the paper pattern.
Trace the punching and then the rectangle from the paper pattern onto the fabric and cut it out. I usually cut it slightly big and then trim it up after. Using glue or stitches, attach the center of the wool fabric securely to the back of the punching in various places, then continue to attach it all the way around the edge leaving the rectangle dangling from the bottom.
Lay the pants hanger over the back of the rug so the bottom bar aligns with the bottom edge of the punching. Secure one half of the hook-and-loop fastener on the bottom of the rectangle and the other half behind the metal hook of the hanger so that when the two halves are joined the rectangle of wool encases the bar of the hanger.) If your hanger tips forward, add another little bit of fastener or a loop of wool near the top of the hook.
Your new Summer hanger will be all the buzz! What will you hang from yours? Stay tuned to for the final installment when we get ready to enjoy the cool, crisp days of autumn.
-
Images

Pattern
-
See below.
Materials
- Monk's cloth or other backing of choice
- Black permanent marker for tracing
- 13" x 15" piece of wool fabric in a complementary color
- Wooden pants hanger with clips
- 8" of peel-and-stick hook-and-loop fastener
- Hot glue gun or needle and thread
- 1 standard sheet of plastic canvas to stabilize the project
- If you are choosing not to sculpt: #14 Fine (the Mini) or #13 Fine (the Mini with Heels) Oxford punch needle
- If you are choosing to sculpt: #14 Fine, #13 Fine, #10 Fine, #9 Fine, #8 Fine Oxford Punch Needles
- 1/4 oz. black
- 1/4 oz. light gray
- 1/2 oz. light turquoise
- 1/2 oz. dark teal
- 1/4 oz. two shades of green
- 1/4 oz. brown
- 1/2 oz. bright bumblebee yellow
- 1/4 oz. golden orange
- 1/2 oz. dark golden yellow
- 1/2 oz. medium golden yellow
- 1/4 oz. light golden yellow
- 2 oz. mulberry
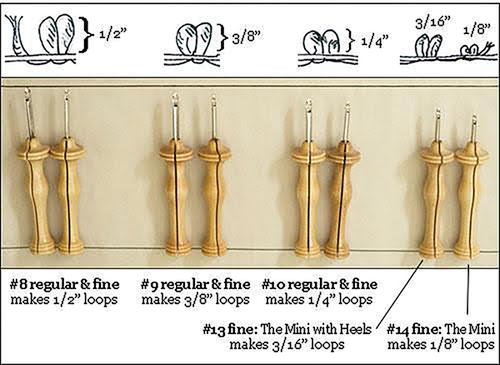
A Parade of Punch Needles
The most popular and easiest to use punch needles available are the Oxford punch needles. They are straightforward, require no threaders, are ergonomic, and feel wonderful in the hand.
They come in eight different standard sizes: five fine punches and three regular punches.
The fine punches take fine yarns: worsted weight or finer, and # 3-cut strips. They are easy to recognise by the narrower needle and the little eyelet on the end of the handle. This eyelet prevents the finer yarns from falling out of the slot in the handle as you punch.
The regular punches take heavier weight yarns, like thick rug yarns and many chunky weight knitting yarns. The needle is wider to accept these thicker yarns and the designs work up quickly.
Numbers are stamped on the punches in the wood near the needle. They indicate the height of the loop that the needle creates. The order is a little bit backward to what you’d expect: the largest number (#14) makes the shortest loop, and the smallest number (# 8) makes the tallest loop. The fine punches come in five heights: 14, 13, 10, 9, and 8. The regular punches come in three heights: 10, 9, and 8. There is no 14 or 13 in the regular punch because the thicker yarns would be prone to popping out if they were this short.
-
This chart courtesy of the Oxford Company.
About the Author:
Simone Vojvodin is a passionate Oxford Punch Needle teacher and award-winning artist. Her work has been featured in art galleries, shows, and Celebration of Hand Hooked Rugs. You can purchase patterns, kits, and punch needle supplies from her studio: Red Maple Ruggery. www.redmapleruggery.ca.